Operation Manual
© 2022 ZOOM CORPORATION
Copying or reprinting this manual in part or in whole without permission is prohibited.
Proper display is not possible on grayscale devices.
Version 4.0
Version 1.0
for iOS/iPadOS
Handy Recorder
for iOS/iPadOS
Handy Recorder PRO

2
iPadOS and AirDrop are trademarks or registered trademarks of Apple Inc.
App Store, iCloud and iCloud Drive are service marks of Apple Inc.
iOS is a trademark or registered trademark of Cisco Systems, Inc. in the USA and other
countries and is used under license.
SoundCloud and the SoundCloud logo are registered trademarks of SoundCloud Ltd.
The Bluetooth® word mark and logo are registered trademarks of Bluetooth SIG, Inc., and
these marks are used under license by Zoom Corporation.
Product names, registered trademarks and company names in this document are the prop-
erty of their respective companies. All trademarks and registered trademarks in this docu-
ment are for identification purposes only and are not intended to infringe on the copyrights
of their respective owners.
Recording from copyrighted sources, including CDs, records, tapes, live performances, vid-
eo works and broadcasts, without permission of the copyright holder for any purpose other
than personal use is prohibited by law. Zoom Corporation will not assume any responsibili-
ty related to infringements of copyrights.
Handy Recorder is a high-performance PCM/AAC recording app that runs on iOS/iPadOS.
This app enables high-quality stereo recording when used with a ZOOM iQ Series stereo
mic (hereafter, “iQ series mic”) designed for iOS/iPadOS devices. Moreover, in addition to
playing, editing and sharing recorded files, this app can also be used to add reverb and oth-
er effects, as well as to start and stop recording automatically in response to the levels of
input audio.
Handy Recorder PRO, which is a paid upgrade, adds support for the Files app and standard
iOS/iPadOS sharing functions, and increases convenience when working with other apps,
various cloud services and computers. The PRO version also has the unique new MOVIE
function that allows audio tracks to be extracted from videos on the iOS/iPadOS device.
Then, EQ, reverb and other effects can be added to the audio before merging it with the
original video.
Copyrights
Handy Recorder overview

3
Contents
Handy Recorder overview 2
Copyrights 2
Contents 3
Installing Handy Recorder 4
Main Screen 5
Portrait view 5
Landscape view 6
Recording 7
Adjusting recording levels 7
Selecting the recording format 7
Recording 8
Recording additional audio 9
Using the automatic recording function 11
Setting Auto Rec to On/Off 12
Setting the Start Level 12
Setting Auto Stop to On/Off 13
Setting the Stop Level 14
Using mid-side recording 15
Setting mid-side monitoring 15
Playing recordings 16
16
Extracting audio from videos 17
Applying effects 18
21
21
23
24
Enabling direct monitoring 25
Setting the Auto Gain function 26
Setting the Digital Mic Gain 27
28
28
29
31
33
34
Changing sharing settings 35
Using iOS/iPadOS sharing functions 36
Files app support function 36
37
Swapping left/right input channels 38
Reversing the screen orientation 39
Resetting the app 39
4
Installing Handy Recorder
1.
Open the App Store on the iOS/iPad OS device and search for “Handy
Recorder”.
2.
Tap “GET” on the Handy Recorder screen.
This will install Handy Recorder on the device.

5
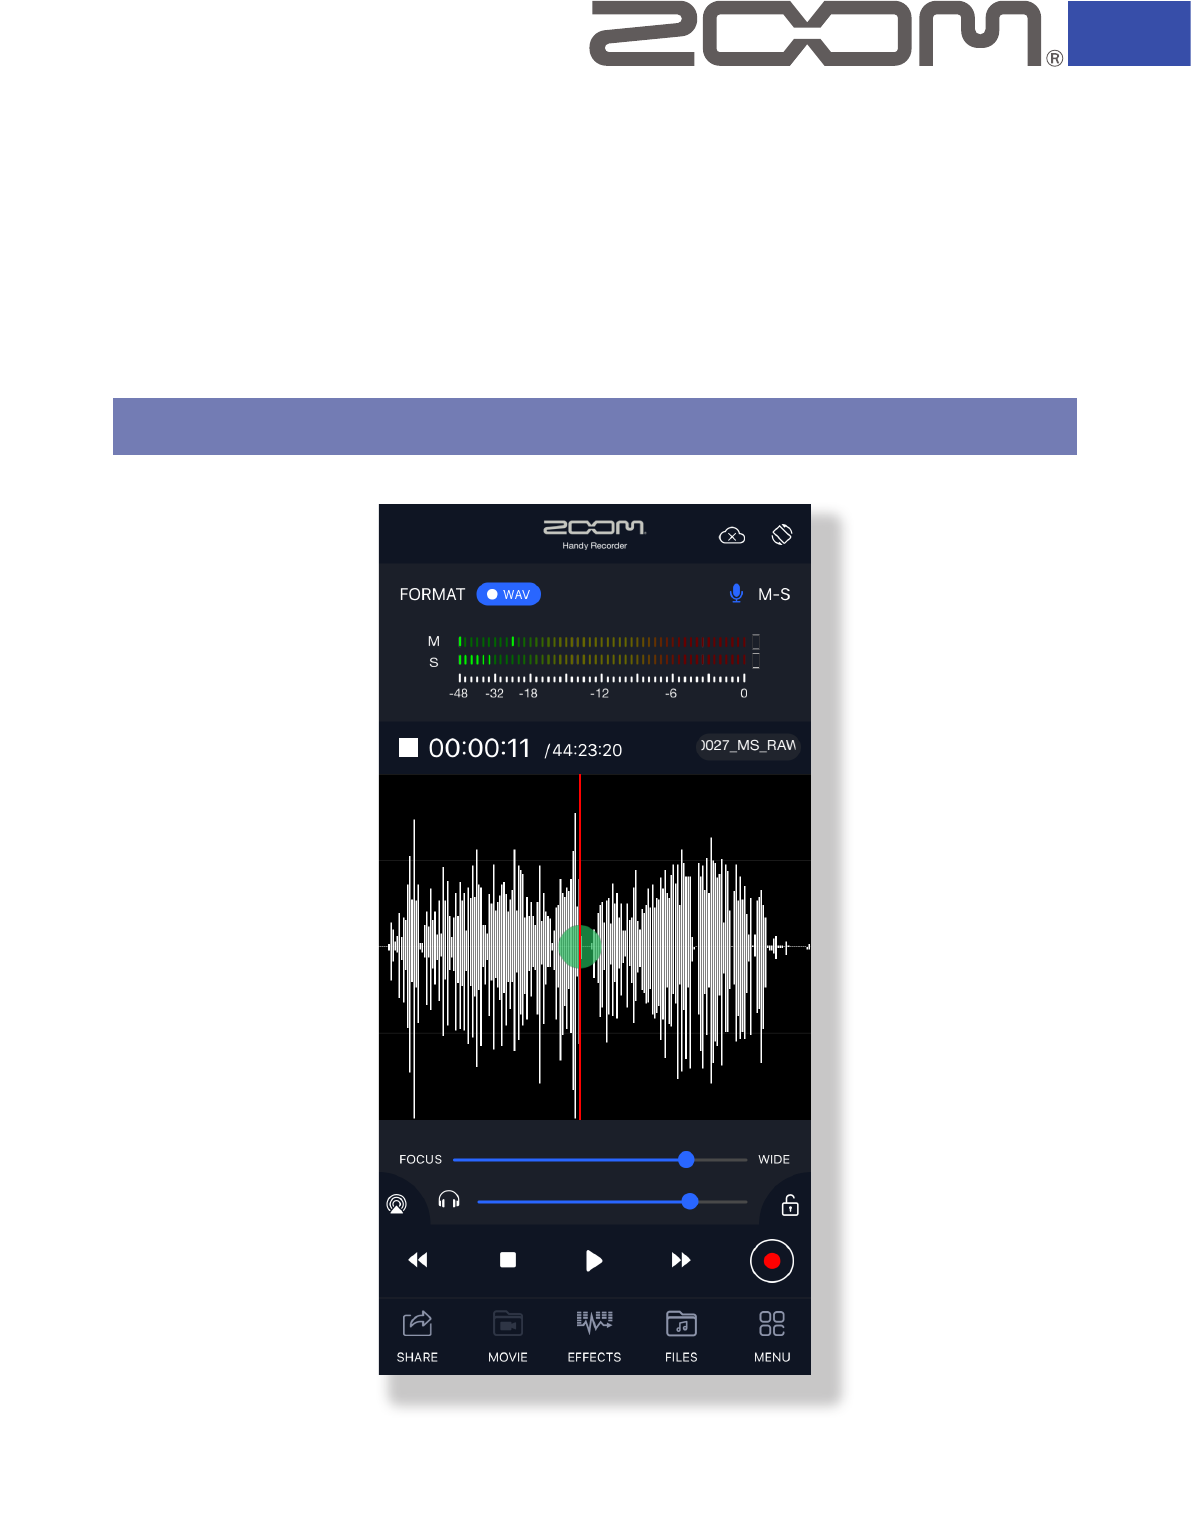
When Handy Recorder launches, the Main Screen appears as shown below.
Main Screen
Status icon
MOVIE button
Output selection button
Level meters
Landscape view button
Stop button
Stereo width
adjustment bar
EFFECTS button
Mute button
Elapsed recording time
Width setting
File name
Lock button
FF button
Record button
FILES button
MENU button
Play button
Volume adjustment bar
Recording format
Auto Sync button
REW button
Waveform display
Playback position
SHARE button
Landscape view button
This switches the screen to landscape view.
Mute button
Tap this to mute the input.
Width setting
90º, 120º, M-S or XY will be shown depending on the state of the iQ
series mic. MONO will be shown if an iQ Series mic is not connected.
Output selection
button
The playback device can be selected.
The playback sound can also be checked on a Bluetooth device.
Stereo width
adjustment bar
Use this to set the stereo width of M-S recording files.
Volume adjustment
bar
The volume output from iQ Series mics can be adjusted.
This is only enabled when an iQ Series mic is connected.
Lock button
When locked, the operation of all other buttons is disabled.
(Available only in Handy Recorder Pro)
Portrait view
In portrait view, all files can be played repeatedly. Repeat playback between two
points is also possible in portrait view by setting the locators in landscape view.

6
Portrait view button
End locator
Undo button
Edit button
Recording mode button
Waveform display
Start locator
File display range
Portrait view button
This switches the screen to portrait view.
Waveform display
Pinch the waveform in and out to zoom out and in.
Start locator
Drag this to set the starting point of the repeat playback interval.
This is also reflected in portrait view.
End locator
Drag this to set the ending point of the repeat playback interval.
This is also reflected in portrait view.
File display range
Light blue indicates the range shown currently. Dark blue indicates parts
that are not shown.
The red line is the current playback position.
The yellow lines are the start and end points of the selected interval.
Undo button
Use this to undo additional recording.
Edit button
Use this to divide or trim the file at the interval start/end points.
Recording mode
button
Use this to switch the recording mode.
Landscape view
In landscape view, additional settings can be made for recording and playback.
Repeat playback of an interval between two points is possible by setting the locators.
7
Adjusting recording levels
When using an iQ Series mic, use its mic gain control to adjust the recording level.
When using the built-in mic of an iOS/iPadOS device, use Digital Mic Gain to adjust it.
(
→
P27)
1.
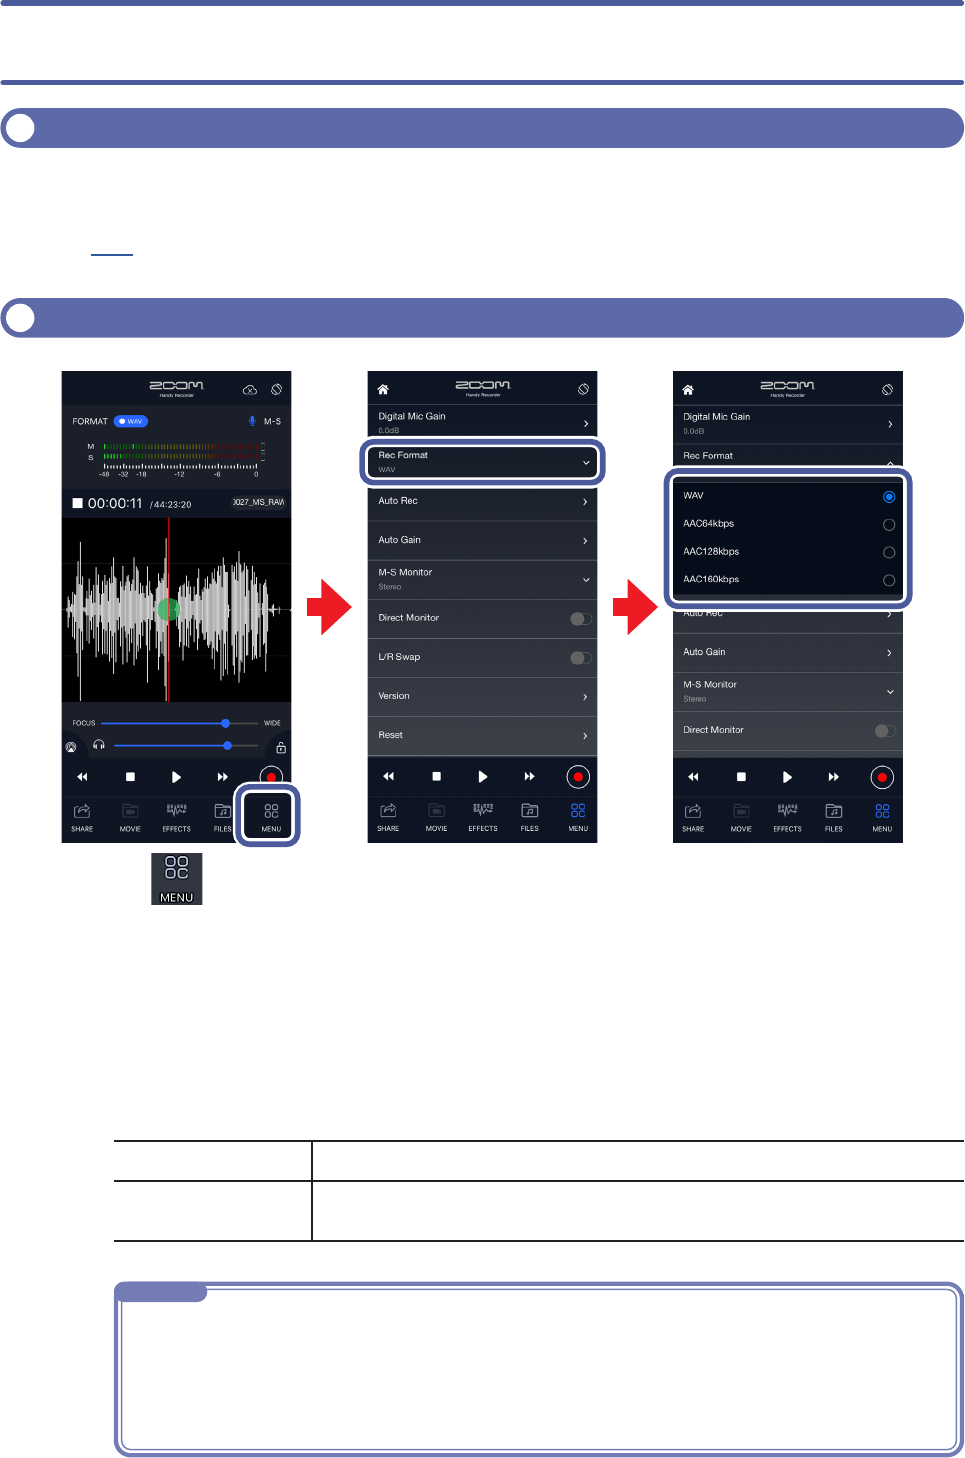
Tap .
2.
Tap “Rec Format”.
3.
Select the recording format.
This is set to “WAV” by default.
The options are WAV, AAC64kbps, AAC128kbps and AAC160kbps.
NOTE
• When using WAV format, if the file size exceeds 2 GB during recording, a new file will be created au-
tomatically. Recording will continue in the new file. No gaps will occur in the recording between files.
• When using AAC format, if the file size exceeds 400 MB during recording, a new file will be created
automatically in the same manner.
• The audio sampling frequency is 48 kHz.
Selecting the recording format
33
WAV format
This is better for recording when audio quality is important.
AAC formats
These provide lower audio quality, but have smaller file sizes and conserve
space on the iOS/iPadOS device.
22
Recording
11

8
1.
Tap .
This starts recording.
Recording
Operations during recording
Pause/resume
Tap .
Stop playback
Tap .
11
9
Recording additional audio
-
corded, overdubbed and inserted.
Available only in landscape view
1.
Check the recording format.
Confirm that LR appears next to the indicators at the top right of the screen for stereo recording.
Confirm that MS appears next to the indicators at the top right of the screen for mid-side record-
ing. (
→
P15)
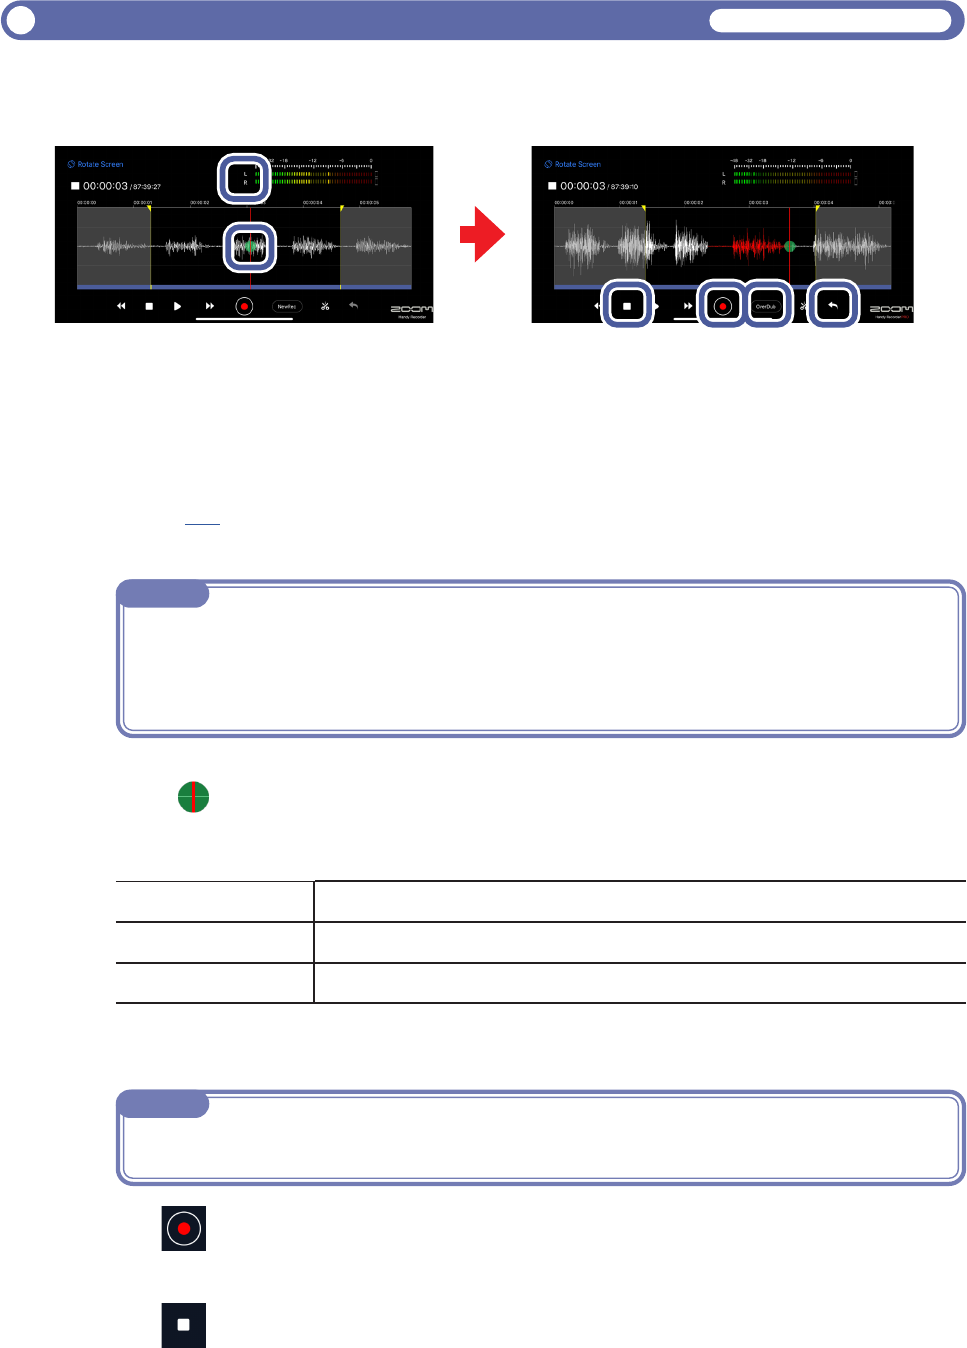
2.
Slide to set the starting point for the additional recording.
3.
Tap “NewRec” and set the recording mode to "OverDub", "Overwrite” or "Insert".
OverDub
This combines (overdubs) the new recording with the original recording.
Overwrite
This replaces (overwrites) the original recording with the new recording.
Insert
This inserts the new recording in the original recording.
NOTE
• Do not add mid-side recording to a standard stereo recording file or add standard stereo recording
to a mid-side recording file.
• Mid-side and stereo recording cannot be added to a mono recording file nor can mono recording be
added to a stereo or mid-side recording file.
NOTE
When the recording mode is set to “NewRec”, a new file will be recorded.
3355 6644
11
22
4.
Tap .
This starts additional recording.
5.
Tap .
This ends additional recording. The waveform is shown in red for the new recording interval.

10
NOTE
• If additional recording has been conducted multiple times, only the most recent one can be undone.
• Additional recording cannot be undone after it has been saved. Doing any of the following will save
the additional recording: dividing, trimming or sharing the file, saving the file after applying effects,
creating a new recording file, selecting a different file, or quitting Handy Recorder.
• Before using "Overwrite", the interval can be set for the additional recording. To set the interval, slide
the start locator to the start point and the end locator to the end point. Additional recording will stop
automatically when the end point of the selected interval is reached.
• The file with the additional recording will be saved with the same format as the original file.
6.
To undo the additional recording, tap .
This restores the state before the new recording was added.

11
44
33
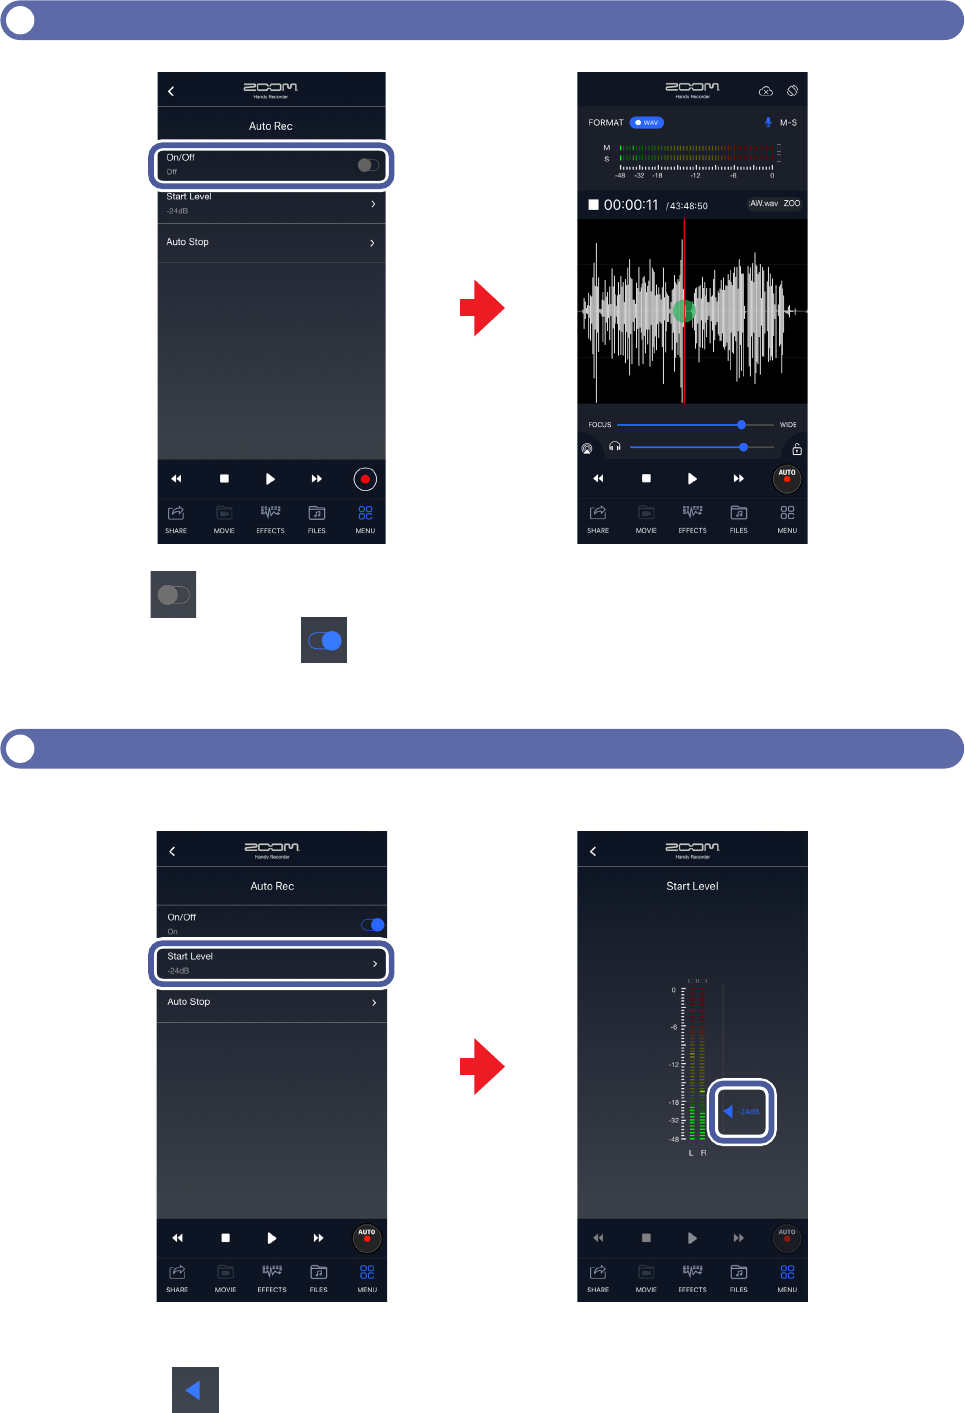
1.
Tap .
2.
Tap "Auto Rec".
On/Off, Start Level and Auto Stop settings can be made for automatic recording.
3.
Tap "On/Off", "Start Level" or "Auto Stop".
See P12–P14 for how to make these settings.
4.
Tap .
This reopens the Main Screen.
5.
Tap .
Recording will start automatically when the input level reaches or exceeds the set Start Level.
55
11
22
Using the automatic recording function
Use the Auto Rec settings to set automatic recording starting and stopping.
12
Setting Auto Rec to On/Off
1.
Tap on the Auto Rec Screen.
Setting the switch to enables the function. When enabled, “AUTO” appears on the record
button.
1.
Tap "Start Level" on the Auto Rec Screen.
2.
Slide to set the start level for automatic recording.
The level can be set between –48 dB and 0 dB. The default setting is –24 dB.
Setting the Start Level
This sets the level when automatic recording starts.
22
11
11

13
Setting Auto Stop to On/Off
This sets the number of seconds until recording stops automatically after the input
becomes lower than the set Stop Level.
1.
Tap "Auto Stop" on the Auto Rec screen.
2.
Tap "On/Off".
3.
Tap the number of seconds until automatic recording stops to select it.
4.
Tap .
The Auto Stop Screen will reopen.
33
44
11
22
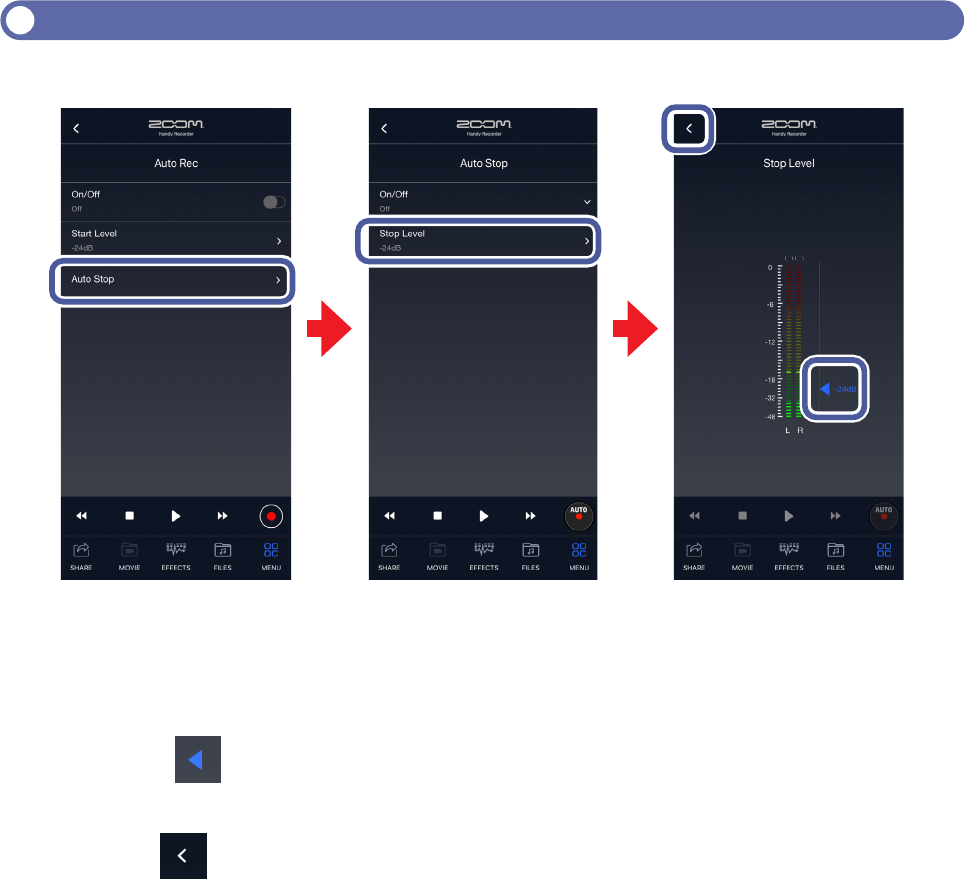
14
Setting the Stop Level
This sets the level when automatic recording stops.
1.
Tap "Auto Stop" on the Auto Rec screen.
2.
Tap "Stop Level".
3.
Slide to set the stop level for automatic recording.
The level can be set between –48 dB and 0 dB. The default setting is –24 dB.
4.
Tap .
The Auto Stop Screen will reopen.
44
33
11
22

15
Setting mid-side monitoring
This sets the type of monitoring to use when mid-side recording.
Using mid-side recording
When using an iQ Series mid-side mic, the mid and side mic signals are recorded
widths can be adjusted freely during playback.
To use mid-side recording, connect an iQ Series mid-side mic, and set its stereo width
switch to “M-S”.
1.
Tap .
2.
Tap "M-S Monitor".
3.
Tap "Stereo" or "M-S".
When set to “M-S”, the mid mic input can be monitored through the left channel and the side
mic input through the right channel.
4.
Tap .
This reopens the Main Screen.
Available only when using an iQ Series mid-side mic
22
NOTE
The stereo width adjustment bar can be used when playing a mid-side recording file. Slide the bar to
set the stereo width.
NOTE
When direct monitoring is on, the M-S Monitor setting will have no effect on the sound monitored
from the iQ Series mic. Monitoring will be as though set to “M-S”.
33
11 44
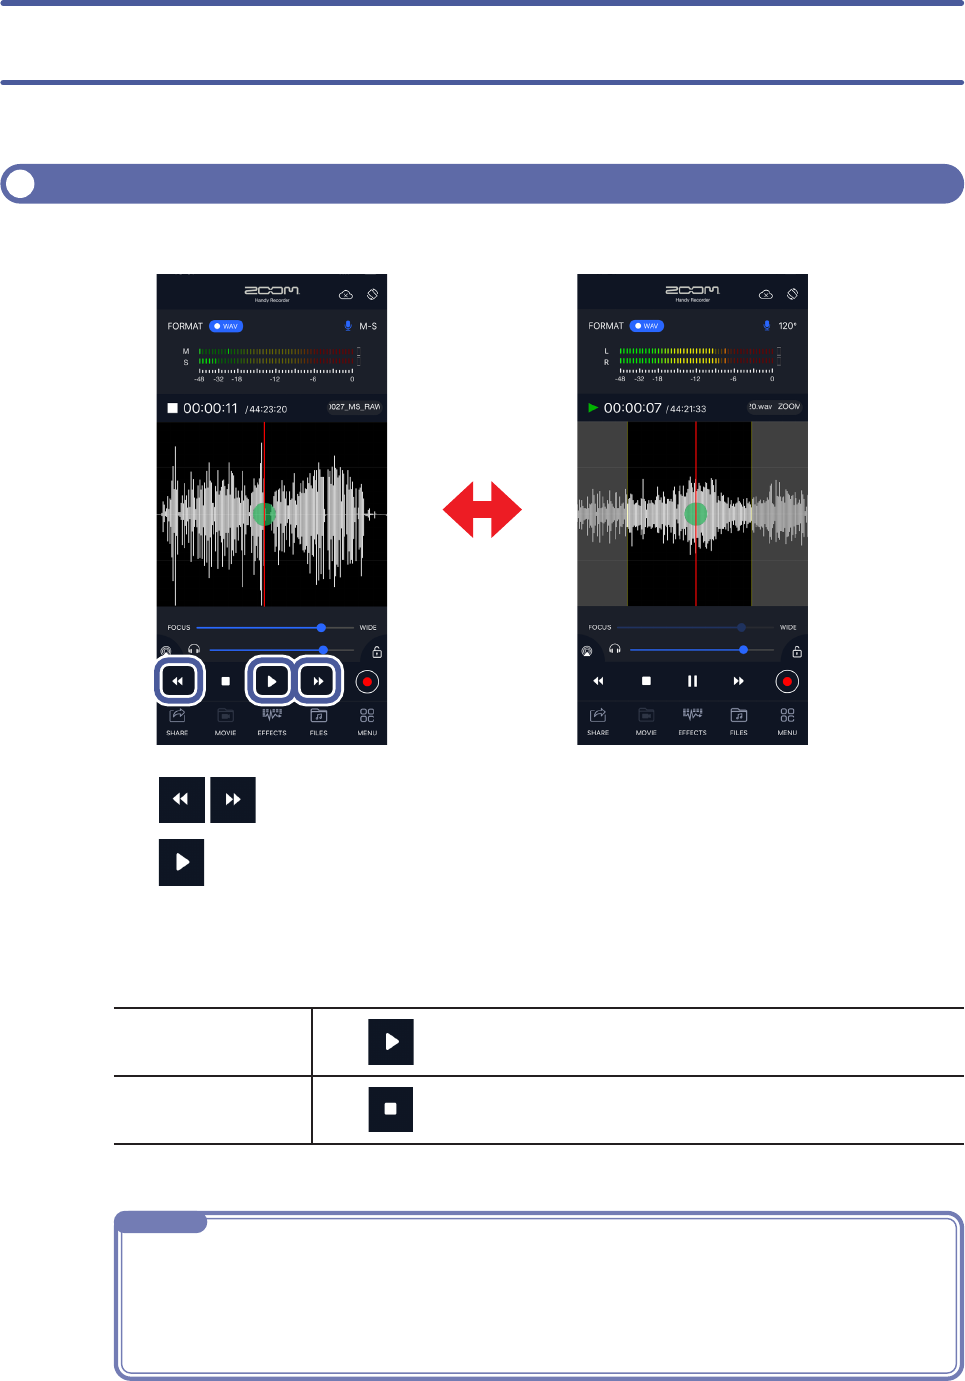
16
1.
Tap on the Main Screen to show the file you want to play.
2.
Tap .
This starts playback.
Recorded files can be played back.
Playing recordings
1122
NOTE
• Landscape view can be enabled during file playback.
• In landscape view, the playback interval can also be set.
• Files cannot be selected while using landscape view.
• Files can also be selected and played on the FILES screen.
Operations during playback
Pause/resume
Tap .
Stop playback
Tap .
Selectinglesandplayingthem
Files can be selected and played when using portrait view.
11

17
Using Handy Recorder PRO, audio can be extracted from a video stored in the Photo app
on the iOS/iPadOS device. Effects can then be applied to the extracted audio file, and then
that file can replace the original audio in the video.
Extracting audio from videos
1.
Tap .
This opens a list of videos in the Photo app.
2.
Select a video.
3.
On the preview screen, tap “Choose”.
A file will be extracted and named “ZOOM_Videonnnn.m4a”.
The “nnnn” is a number assigned in order starting with 0001.
4.
Apply effects (
→
P18).
5.
Merge the file with the video (
→
P24).
Available only in Handy Recorder Pro
11
33
2:30
22
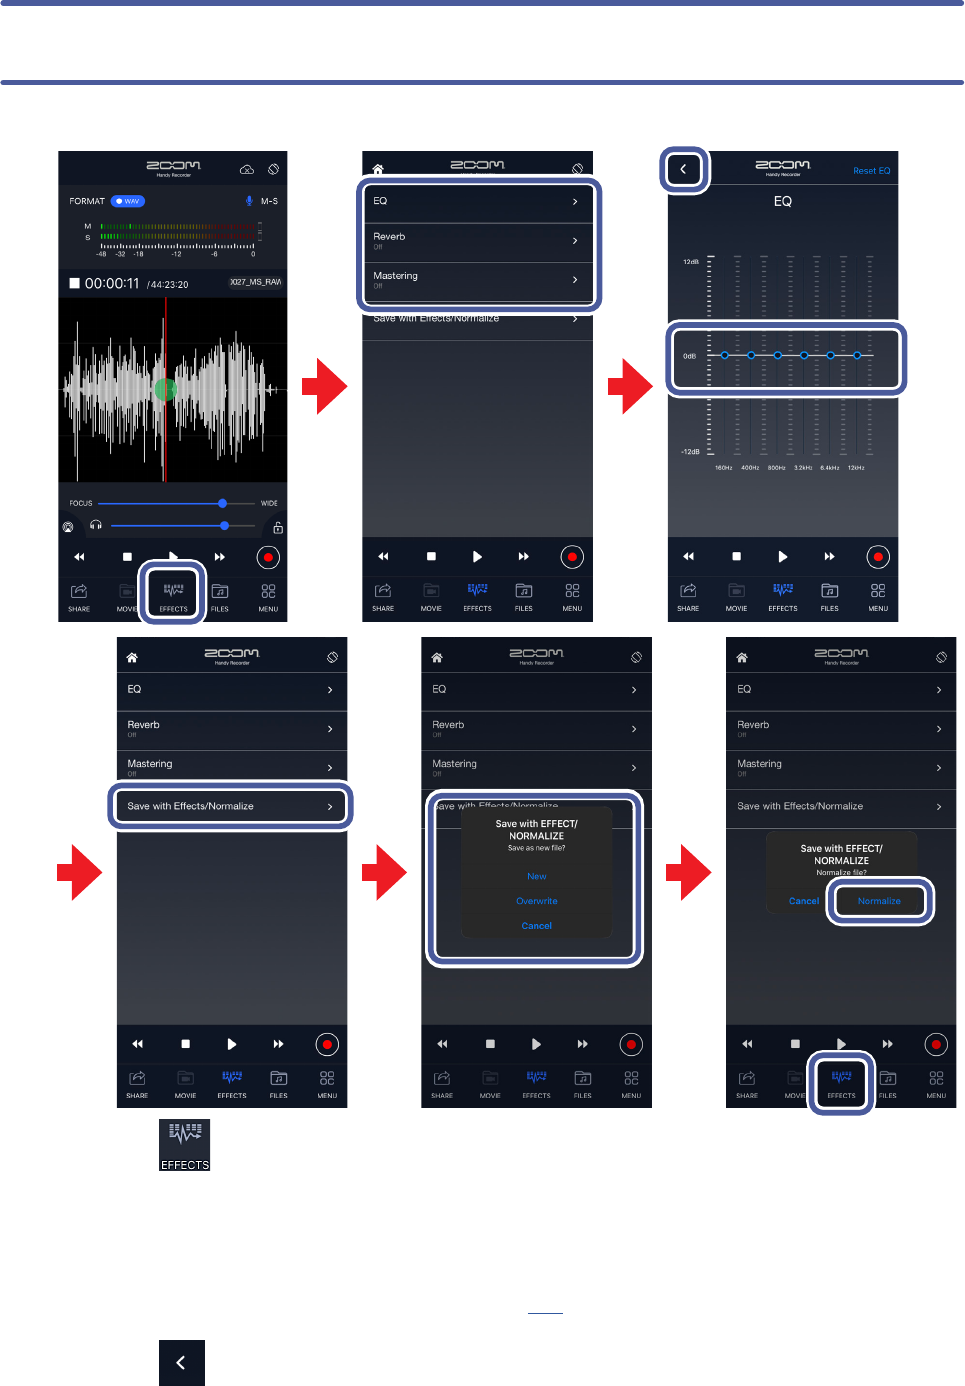
19
NOTE
• Do not turn the iOS/iPadOS device off or quit Handy Recorder while it is saving a file. Doing so could
damage the data.
• The sound of the effects can be heard when playing a file after effects have been applied to it.
• The set effects are applied to the sound of playback. They are not applied to input sounds.
6.
In the “Save as new file?” message, tap "New", "Overwrite” or "Cancel” to select
how the file is saved.
New
This preserves the original file and creates a new file with the effects applied. The
created file will be saved with the latest number in the file name.
Overwrite
This overwrites the original file with the set effects applied.
Cancel
No file with the set effects will be created.
7.
To optimize the volume, tap "Normalize" in response to the “Normalize file?”
message.
“Complete!" will appear when optimization completes.
Tap "Cancel” to save the file without optimization.
8.
Tap .
This reopens the Main Screen.

20
Setting effects
■
EQ (augment/enhance audio quality)
Slide
on the faders for the 160 Hz,
400 Hz, 800 Hz, 3.2 kHz, 6.4 kHz and 12
kHz frequency bands to adjust the audio
quality.
■
Reverb (add reverberations to sound)
This is off by default.
Select "Room", "Jazz Club", "Concert Hall",
"Arena” or "Stadium".
Off
Off
Room
Simulates the reverberations of a room
Jazz Club
Simulates the reverberations of a jazz club
Concert Hall
Simulates the reverberations of a concert hall
Arena
Simulates the reverberations of an arena
Stadium
Simulates the reverberations of a domed stadium
■
Mastering (add impact to sound)
This is off by default.
Select "Maximize", "Ultra Maximize", "Clear
& Power", "Wide” or "Mono".
Off
Off
Maximize
Soft compression that evens out the sound level
Ultra
Maximize
Strong compression that evens out the sound level
Clear &
Power
Compression that emphasizes the midrange
Wide
Emphasizes stereo elements
Mono
Combines sound from the stereo field into the center
21
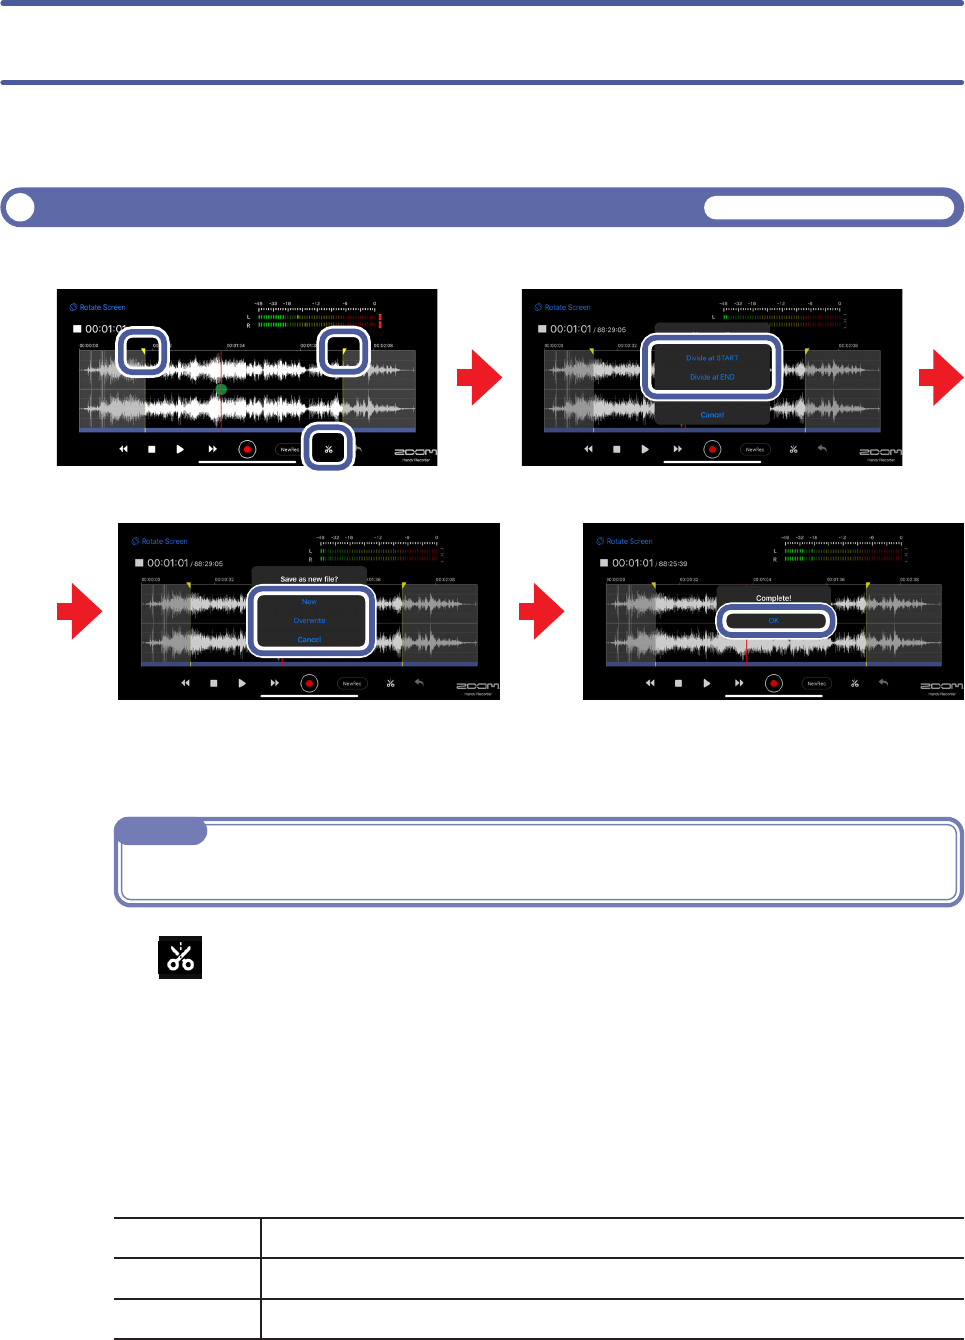
Dividingles
Available only in landscape view
1.
Slide the start or end locator to the file division point.
2.
Tap .
“Choose edit.” appears.
3.
Tap “Divide at START” or “Divide at END”.
A “Save as new file?” message appears.
4.
Tap "New", "Overwrite” or "Cancel".A “Now Processing” message appears.
When division completes, a “Complete!" message will appear.
New
This creates new divided files, keeping the original file.
Overwrite
This replaces the original file with the divided files.
Cancel
This cancels division.
5.
Tap “OK”.
Recorded files can be divided, trimmed and deleted.
Editing files
33
44
NOTE
The file can be played to check the division point.
55
11 11
22

22
NOTE
• Do not turn the iOS/iPadOS device off or quit Handy Recorder while it is dividing a file. Doing so
could damage the data.
• The divided file will be saved as the first part, named after the file before division with A added to the
end, and the latter part, named after the file before division with B added to the end.
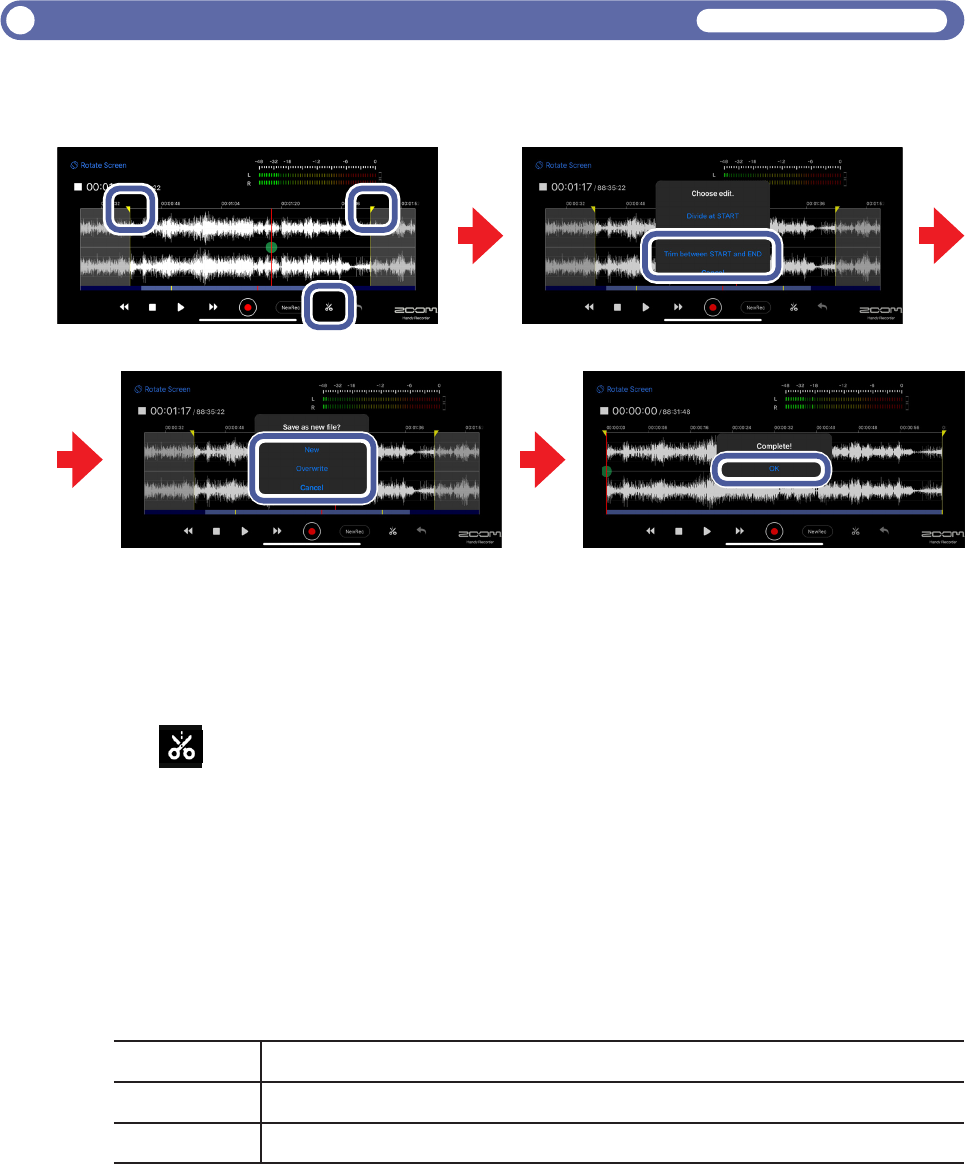
23
1.
Slide the start locator to the start point.
2.
Slide the end locator to the end point.
3.
Tap to trim the file to the selected range.
“Choose edit.” appears.
4.
Tap "Trim between START and END".
A “Save as new file?” message appears.
5.
Tap "New", "Overwrite” or "Cancel".
A “Now Processing” message appears.
"Complete!" will appear when for trimming finishes.
New
Overwrite
Cancel This cancels trimming.
6.
Tap “OK”.
Trimmingtheendsofles
This can only be used in landscape view.
Available only in landscape view
11
22
44
33
55
66

24
1.
Tap .
2.
Tap “Select”.
This opens a file selection screen.
3.
Tap the names of files to select them.
will appear in front of the names of selected files. Multiple files can be selected.
Tap "All” to select all the files.
22
Share
Tap . This opens the SHARE screen. (
→
)
Merge
Tap . Extracted audio can be merged with the original video.
After merging completes, the file will be deleted from Handy Recorder PRO. The
merged video will be saved in the HandyRecorder PRO folder in the Photos app.
Delete
Tap .
“Delete file(s)? This will delete the selected file(s). It cannot be undone!” will appear.
Operations after selection
Recorded and extracted files can be shared, deleted and merged with videos.
Managing files
11
33

25
The sound directly output from the mic can be monitored without latency.
Enabling direct monitoring
Available only when using iQ Series mics
1.
Tap .
2.
Tap next to “Direct Monitor”.
Setting the switch to enables the function.
3.
Tap .
This reopens the Main Screen.
NOTE
• The direct monitoring setting has no effect when using an iQ Series mic with an app other than
Handy Recorder.
• When direct monitoring is on, the sound input from the mic can be monitored even during file play-
back.
• When direct monitoring is on, the Digital Mic Gain setting does not affect the sound monitored from
the iQ Series mic. It does affect the sound recorded by Handy Recorder.
• When direct monitoring is on, the M-S Monitor setting will have no effect on the sound monitored
from the iQ Series mic. Monitoring will be as though set to “M-S”.
11 33
22
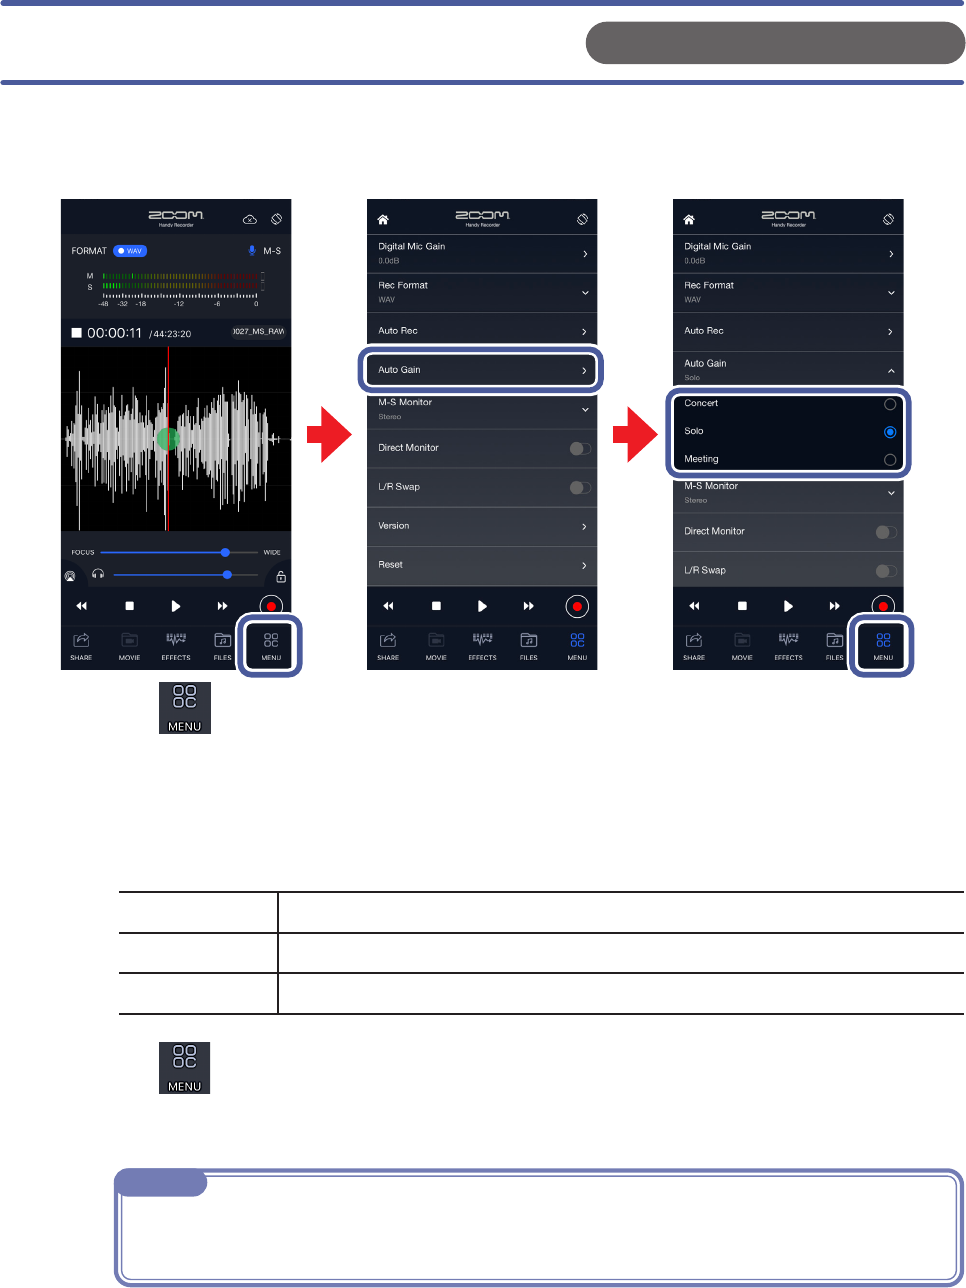
26
1.
Tap .
2.
Tap "Auto Gain".
3.
Tap "Concert", "Solo” or "Meeting".
The default setting is Solo.
Concert
Use this for band performances, concerts and other loud situations.
Solo
Use this for acoustic guitar and solo performances.
Meeting
Use this for meetings and other quiet recordings.
4.
Tap .
This reopens the Main Screen.
NOTE
The "Auto Gain" setting selected in Handy Recorder is remembered by the iQ5 itself and will be ap-
plied when the iQ5 is used with other applications.
When the
iQ5
AUTO GAIN/LIMITER switch is set to AUTO GAIN, the optimal setting
can be selected according to the situation.
Setting the Auto Gain function
Available only when using an iQ5 mic
33
11 44
22

27
Use this to adjust the recording level and record quiet sources at a higher level and loud
sources at a lower level.
Setting the Digital Mic Gain
1.
Tap .
2.
Tap "Digital Mic Gain".
3.
Slide to adjust the gain (in dB).
4.
Tap .
This reopens the Main Screen.
11
33
44
22
28
Recorded files can be shared by uploading them to iCloud and SoundCloud or sending
them by email.
Using Auto Sync, files can be automatically uploaded to iCloud after recording finishes.
Sharing recorded files
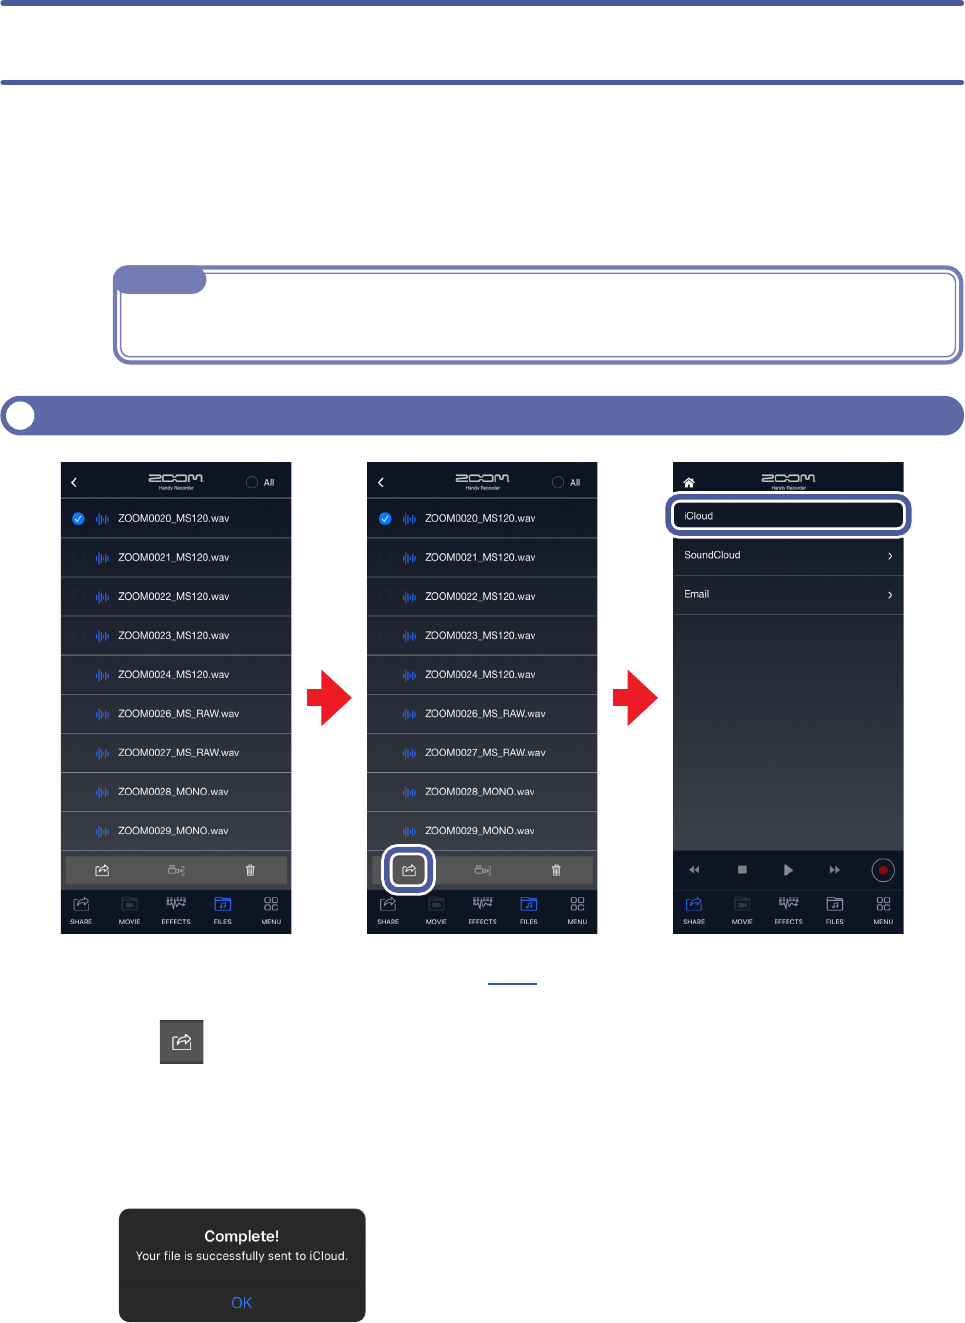
SelectingrecordedlesanduploadingthemtoiCloud
22
1.
Select files on the FILES screen (
→
P24).
2.
Tap .
3.
On the SHARE screen, tap “iCloud”.
A message will appear, and the recorded file will be uploaded.
NOTE
Before deleting recorded files from Handy Recorder, confirm that they have completed uploading to
iCloud.
33
22
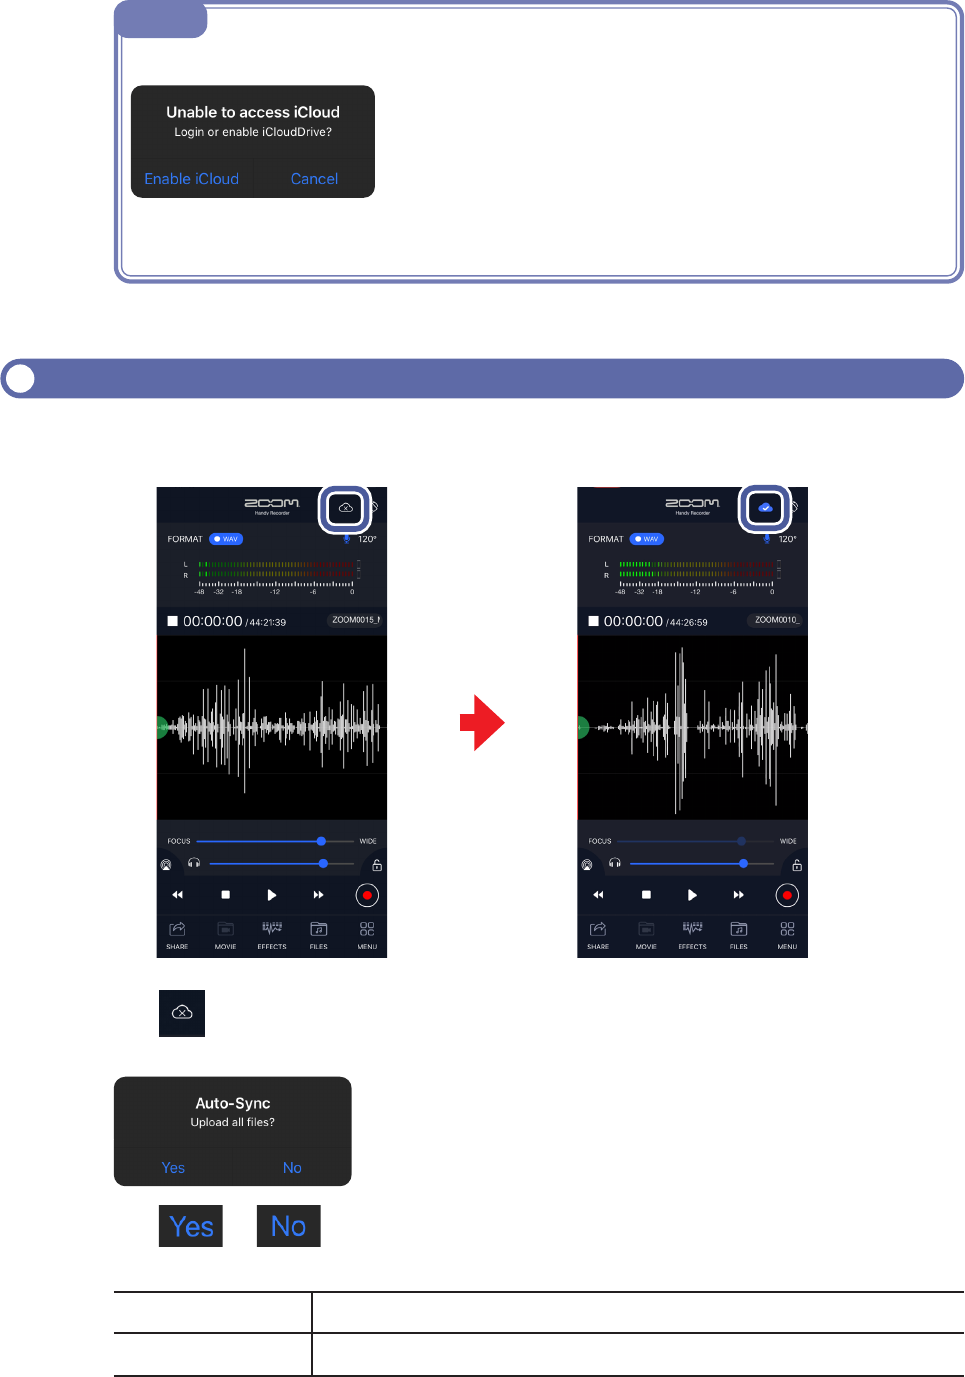
29
1.
Tap on the Main Screen.
When Auto Sync is enabled, a message will appear.
2.
Tap or .
Yes
All recorded files will be uploaded.
No
Newly recorded files will be uploaded.
NOTE
The following message appears if the iCloud Drive is unavailable.
Tap “Enable iCloud”, and activate iCloud Drive in the iOS/iPadOS device settings.
AutomaticallyuploadingrecordedlestoiCloud
When Auto Sync is enabled, files will be uploaded automatically after recording
completes.
11
30
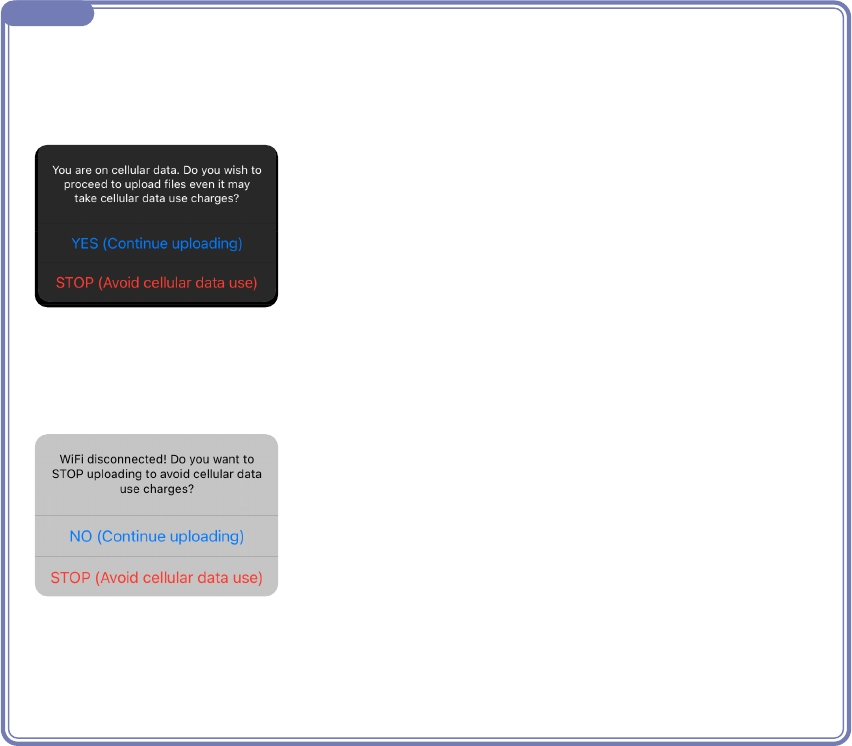
NOTE
• When “Yes” is tapped, already uploaded files will not be uploaded again. If a file with the same name
has different recording content, however, a number will be added to the end of the file name and it
will be uploaded.
• If Auto Sync is enabled when cellular data is being used, the following message will appear.
Tapping “Yes” to continue uploading could result in data transmission charges, so choose this op-
tion with caution.
• When Auto Sync is enabled, if data transmission switches from Wi-Fi to cellular data, the following
message will appear.
Tapping “No” to continue uploading could result in data transmission charges, so choose this option
with caution.
• Messages related to transmission charges will appear in English, Japanese, French, German, Italian
or Spanish according to the Language & Region settings on the iOS/iPadOS device.

31
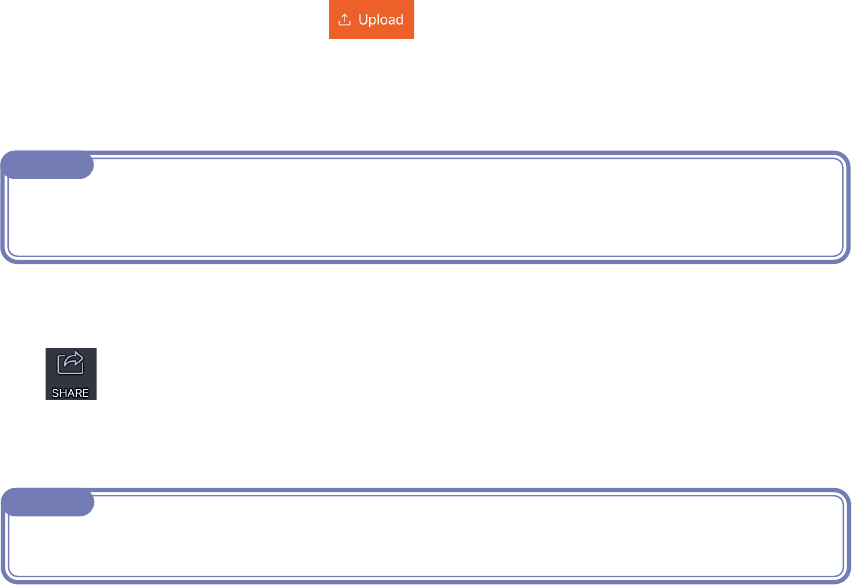
UploadinglestoSoundCloud
1.
Tap .
2.
Tap “SoundCloud”.
3.
Tap .
This opens the SoundCloud account input screen.
If you do not already have a SoundCloud account, you can get one on the SoundCloud website.
33
44
55
22
11
66
32
5.
Tap “Logout”.
6.
Tap .
This opens the Main screen.
4.
Log in to SoundCloud, and tap .
“Uploading...” appears.
“Complete!” will appear when uploading finishes.
NOTE
Do not turn the iOS/iPadOS device off or quit Handy Recorder while it is uploading a file. Doing so
could damage the data.
NOTE
If an interval in the file has been selected, the file will be trimmed to that interval and uploaded.

33
1.
On the SHARE screen, tap “Email”.
2.
Tap .
A message will be created, and the recorded file will be attached.
3.
Input the To, Subject and body fields and tap the send button.
The message with the recording file attached will be sent.
Attachinglestoemailandsendingthem
(
→
P36)
22
33
NOTE
• When selecting a file, if an interval in the file has been selected, the file will be trimmed to that inter-
val and attached to the email.
• If an email account has not been activated, the following message will appear. “No Email Account.
Please set up an email account in order to send email.”
• If the maximum email attachment size is exceeded, the following message will appear. “The email
could not be sent. The audio file exceeds the email attachment size limitation in Settings.” (
→
P35)
11
Attachinglestoemailandsendingthem

34
Changingthenamesofleswhensharing
11
22
33
1.
Tap on the SoundCloud/Email screen.
2.
Input the file name.
3.
Tap “return”.
4.
Tap “OK”.
This changes the file name.
44
35
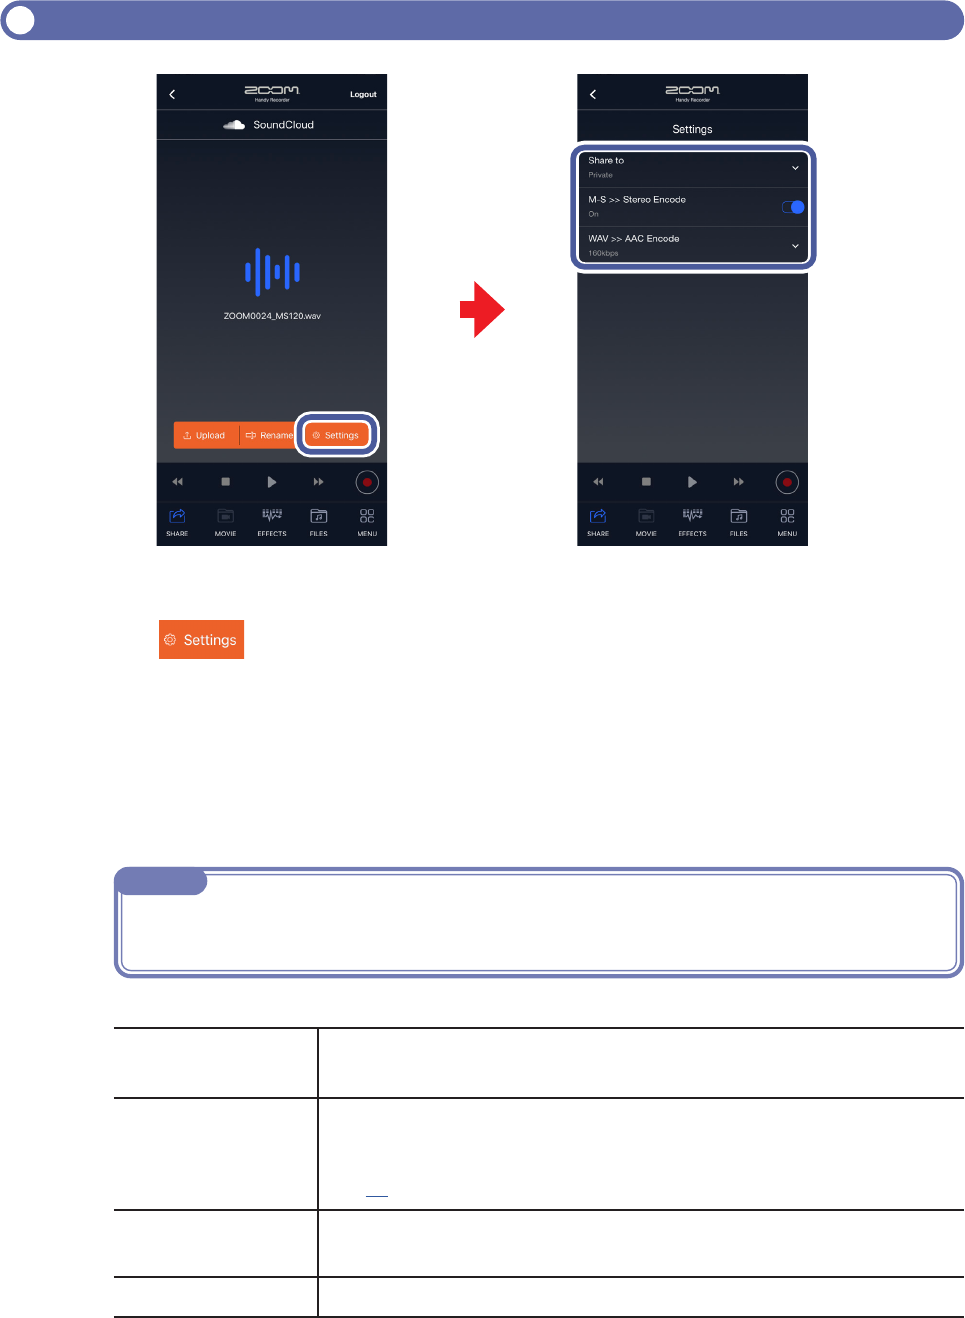
Changing sharing settings
Share to
Set the public status of files uploaded to SoundCloud (Private or Public).
M-S >> Stereo
Encode
When uploading, set whether or not to encode mid-side recording files as
stereo (On or Off).
The stereo width adjustment bar setting will be applied when encoding.
(
→
P5)
WAV >> AAC
Encode
When uploading, set whether or not to encode WAV format file recording
files as AAC Format (Off, 64 kbps, 128 kbps or 160 kbps).
EMAIL LIMIT
This sets the size limit for files attached to email (1 – 25 MB).
11
2.32.3
1.
Tap on the SoundCloud/Email screen.
This opens the Settings Screen.
2.
Tap "Share to", "M-S >> Stereo Encode", "WAV >> AAC Encode” or "EMAIL
LIMIT".
3.
Change the setting.
NOTE
•
"Share to” can only be set with SoundCloud.
• "EMAIL LIMIT” can only be set with Email.

36
Files app support function
In Handy Recorder PRO, recorded files are managed in the iOS/iPadOS Files app.
NOTE
• The first time a recording is made, a HandyRecorder PRO folder will be created in the Files app on
the iPhone.
• Changes made in the Files app will be reflected in Handy Recorder PRO.
Using iOS/iPadOS sharing functions
11
Available only in Handy Recorder Pro
1.
On the SHARE screen, tap “Others”.
This shows the iOS/iPadOS sharing functions.
Available only in Handy Recorder Pro

3737
When an iQ Series mic is connected, its firmware can be updated to the latest version.
This example is of an iQ5 being updated to version 1.10.
1.
Tap .
2.
Scroll the MENU screen, and tap "Firmware Update".
If an iQ Series mic is connected properly, the current and latest versions will be shown.
Updating iQ Series mic firmware
NOTE
If “Unsupported function.” appears, an iQ Series mic is not properly connected.
22
33
44
11

38
3.
Tap .
4.
When “Would you like to continue?” appears, tap “Update”.
An “ Updating...” message will appear.
Tap "Cancel” to not conduct the update.
When updating completes successfully, the following message will appear. “Rebooting the iQ5...
Do not disconnect the iQ5.” Then, the Main Screen will open automatically.
(The message that appears after updating completes will show the model name of the connected iQ Series
mic. This example uses an iQ5 , so “ iQ5 ” is shown.)
NOTE
• Do not disconnect the iQ Series mic from the iOS/iPadOS device or quit Handy Recorder while the
firmware version is being updated.
• During a firmware update, if the phone or alarm functions of the iOS/iPadOS device are used, the up-
date could be interrupted and the iOS/iPadOS could become unstartable. Before updating the firm-
ware, put the iOS/iPadOS device into Airplane Mode and turn off alarms.
• Confirm that the iOS/iPadOS device has enough remaining battery charge before starting a firmware
update.
• In the unlikely event that a firmware update should fail while in progress, conduct the procedures
from the beginning to update the firmware again.
The left and right channels can be swapped on iQ Series mics. This is convenient if, for
example, the iQ Series mic channels are reversed when recording video using the built-in
camera of the iOS/iPadOS device.
Swapping left/right input channels
1.
Tap .
This opens the MENU screen.
2.
Tap next to "L/R Swap".
Setting the switch to enables the function.
Available only when using iQ Series mics
NOTE
The "L/R Swap” setting is remembered by the iQ Series mic itself, and will applied when using it with
other apps.

39
All Handy Recorder settings can be reset at once.
1.
Tap .
This opens the MENU screen.
2.
Tap “Reset”.
“Reset all Handy Recorder settings? It cannot be undone!” will appear.
Tap "Reset” to execute the operation or tap "Cancel”.
“Complete!" will appear when optimization completes.
Resetting the app
The screen orientation can be reversed on iPhones that do not have Home Buttons.
1.
Tap .
This opens the MENU screen.
2.
Tap next to "Upside Down".
Setting the switch to enables the function.
Reversing the screen orientation

