
FLAT TV
User Manual
philips
26PFL5322
32PFL5332
32PFL7342
37PFL5332
37PFL7342
42PFL5332
42PFL5432
42PFL7342
52PFL5432
IMPORTANT!
Registering your model with PHILIPS makes you eligible for all of the valuable benefits
listed below, so don’t miss out.Complete and return your Product Registration Card at
once to ensure:
Return your Warranty Registration card today to
ensure you receive all the benefits you’re entitled to
For Customer Use
Enter below the Serial No., which is
located on the rear of the cabinet. Retain
this information for future reference.
Model No.__________________________
Serial No. __________________________
Congratulations on your purchase, and welcome to the
“family!”
Dear PHILIPS product owner:
Thank you for your confidence in PHILIPS.You’ve selected one
of the best-built, best-backed products available today. We’ll do
everything in our power to keep you happy with your
purchase for many years to come.
As a member of the PHILIPS “family,” you’re entitled to
protection by one of the most comprehensive warranties and
outstanding service networks in the industry.
What’s more, your purchase guarantees you’ll receive all the
information and special offers for which you qualify, plus easy
access to accessories from our convenient home shopping
network.
Most importantly, you can count on our uncompromising
commitment to your total satisfaction.
All of this is our way of saying welcome - and thanks for
investing in a PHILIPS product.
P. S. To get the most from your PHILIPS purchase,be
sure to complete and return your Product
Registration Card at once.
Know these
safety symbols
This “bolt of lightning” indicates
uninsulated material within your unit
may cause an electrical shock.For the safety
of everyone in your household, please do not
remove product covering.
The “exclamation point” calls attention
to features for which you should read
the enclosed literature closely to prevent
operating and maintenance problems.
WARNING:To reduce the risk of fire or
electric shock,this apparatus should not be
exposed to rain or moisture and objects
filled with liquids, such as vases, should not
be placed on this apparatus.
CAUTION: To prevent electric shock,
match wide blade of plug to wide slot, fully
insert.
ATTENTION :Pour éviter les chocs
électriques, introduire la lame la plus large de
la fiche dans la borne correspondante de la
prise et pousser jusqu’au fond.
* Proof of Purchase
Returning the enclosed card
guarantees that your date of
purchase will be on file, so no
additional paperwork will be
required from you to obtain
warranty service.
* Product Safety
Notification
By registering your product you’ll
receive notification - directly
from the manufacturer - in the
rare case of a product recall or
safety defect.
* Additional Benefits of
Product Ownership
Registering your product
guarantees that you’ll receive all
of the privileges to which you’re
entitled, including special money-
saving offers.
Visit our World Wide Web Site at http://www.philips.com
Overview of television controls and
connectors .........................................................5
Side controls .................................................5
Overview of remote control keys and
functions .............................................................6
Using the on-screen menus ...........................8
Searching and storing your channels
automatically .....................................................9
Manual installation ...........................................10
Changing the Tuner Mode .........................10
Changing the TV System ............................11
Fine Tuning your channels .........................12
Naming your channels ....................................13
Storing your favorite channels ......................14
Adjusting your picture settings .....................15
Adjusting your sound settings .......................16
Using the timer .................................................17
Setting the TV time .....................................18
Displaying the TV time ...............................18
Setting the wake-up clock..........................19
Child-locking the TV ......................................21
Enabling Child Lock .....................................21
Disabling Child Lock ...................................21
Controlling access to TV channels ..............22
Accessing Parental Lock .............................22
Changing Access Code ...............................23
Locking channels ..........................................24
Controlling access to TV programs.............25
Using the movie rating lock
(for certain regions only) ...........................25
Using the TV Rating lock
(For certain regions only) ..........................27
Turning off Blocking ....................................29
Blocking other programs ...........................29
Using Active Control ......................................30
Turning off Active Control ........................30
Using Ambilight (certain models only) ........31
Turning on Ambilight ..................................31
Turning off Ambilight ..................................31
Adjusting brightness ....................................32
Selecting Ambilight modes .........................32
Selecting Ambilight color ...........................33
Using Custom color ....................................34
Setting Ambilight balance ...........................35
Turning on Closed Captions .........................36
Changing your picture format .......................37
Using the Auto Sound and Auto Picture
features ...............................................................38
Using the Surf feature .....................................39
Adding channels to your Surf list .............39
Removing channels from Surf list .............39
Using the Source List ......................................40
Using your TV as a computer monitor .......41
Picture settings (VGA mode) ....................41
Feature settings (VGA mode) ...................41
Using your TV in High Definition
(HD) mode ........................................................42
Connecting the HD equipment ................42
Controlling the TV settings in
HD mode .......................................................42
Using Mode Selection(Applicable to
480p and 720p only) ...................................43
Using Native 1080 mode
(For 1080p TV models only) .....................43
Troubleshooting ...............................................45
Specifications .....................................................47
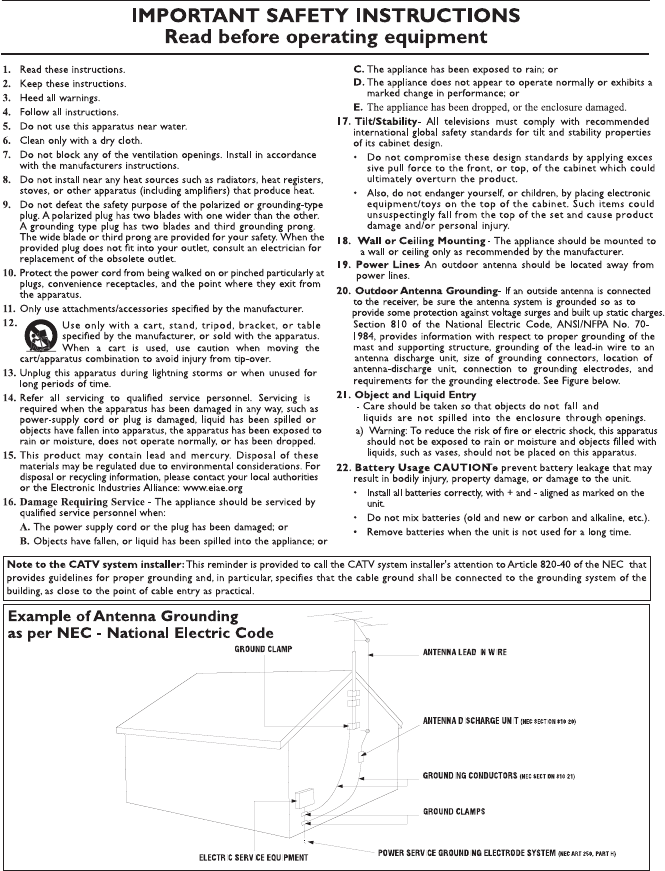
CONTENTS
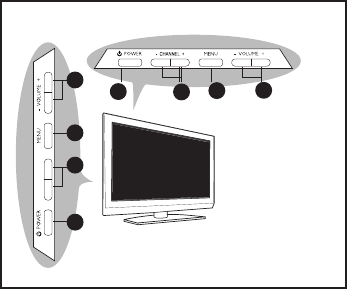
5
Overview of television controls and connectors
2
3
4
1
- CHANNEL +
1
2
3
4
26PFL5322 (Mexico), 32PFL5332, 32PFL7342
37PFL5332, 37PFL7342, 42PFL5332, 42PFL7342
26PFL5322
Side controls
The side controls are on the left side or top
of the TV set.
VOLUME + / -1.
To increase volume level, press VOLUME
+, to decrease level, press VOLUME -.
MENU2.
To display the on-screen menus or to
exit from the on-screen menus.
The CHANNEL + /- buttons can be
used to navigate the menu items.
The VOLUME + / - buttons can be used
to select the menu items.
CHANNEL + / -3.
To select the TV channel numbers up-
wards or downwards.
POWER 4. .
To turn off or turn on the TV set.

6
Overview of remote control keys and functions
1
2
3
4
5
6
7
8
9
10
11
12
13
Standby button 1. .
To switch the TV to standby mode if it
is already turned on. Or to turn on TV
when it is in standby mode.
SAP button 2.
To select SAP, Stereo and forced Mono.
Pixel Plus Demo button 3.
To turn on or turn off Pixel Plus Demo.
When turned on, a split-screen display
shows Pixel Plus active on one half and
Pixel Plus inactive on the other half.
SURF button 4.
To channel surf up to 8 channels.
Auto Sound button 5.
To select factory pre-set Sound settings.
Incredible Surround button 6.
To enable Incredible Surround in stereo
mode and Spatial in mono mode.
Cursor buttons 7.
To navigate and select menu items and
adjust indiividual settings
OK button 8.
To select menu items or confirm selec-
tion.
Mute button 9.
To turn up or turn down the sound level.
Volume buttons 10.
To turn up or turn down the sound level.
Not applicable.11.
Numeric (0-9) buttons 12.
To enter channel number, set time or
timer.
Exit / Status button 13.
To exit on-screen menus.
Or to display information on the current
channel.

7
Overview of remote control keys and functions
14
15
16
17
18
19
20
21
Picture Format button 14.
To cycle through list of available picture
formats.
AV button 15.
To display AV source list or to cycle
through list of AV sources by repeatedly
pressing button.
Closed Captions button 16.
To display current Closed Caption setting
or cycle through list by repeatedly press-
ing button.
Auto Picture button 17.
To select factory pre-set Picture settings.
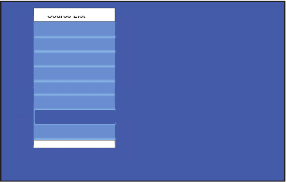
Program List button 18.
To display the list of available channels
which you can scroll through using the
cursor buttons.
Menu button 19.
To display the on-screen menus and exit
menus from the screen.
Channel buttons 20.
To select the channel number upwards or
downwards.
Alternate Channel button 21.
To display the last viewed channel and
the current channel.
NOTE:
The u button is used to select menu items
or confirm your selection.
You can also press the Æ button instead of
the u button. Either buttons will work in
the same context. For brevity, only the u
button will be mentioned in the User Manual.

8
Using the on-screen menus
Main
Brightness
Color
Install
Picture
Features
Sound
Contrast
Sharpness
Color Temp
Contrast +
NR
Install
English
Spanish
Manual
Language
Auto Program
T uner Mode
Portuguese
Name
Fav. Program
Main
Language
T uner Mode
Install
Picture
Features
Sound
Auto Program
Manual
Name
Fav. Program
Install
English
Spanish
Manual
Auto Program
T uner Mode
Portuguese
Name
Fav. Program
Language
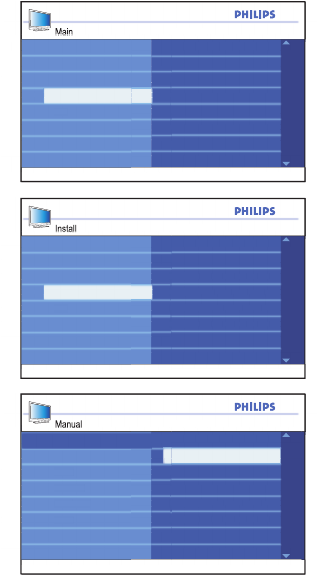
Before using the on-screen menus, select
your menu language.
Press 1. h button to display the on-screen
menus.
Press 2. ï button untill Install is
highlighted.
Press 3. u button to select Language.
The available languages for your TV will
be displayed on the right panel.
Press 4. u button to highlight the first lan-
guage or ï to select the other available
languages.
Press 5. u button to select the language.
Press 6. h or EXIT button to exit the
on-screen menus.
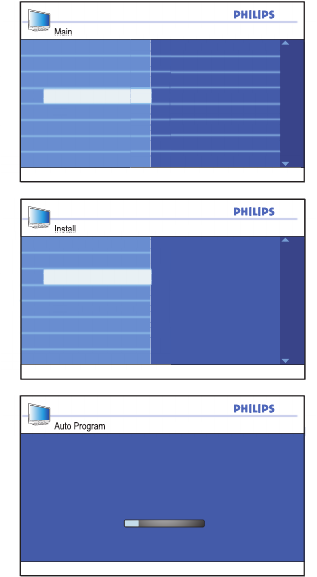
9
Searching and storing your channels automatically
When you are using the TV for the first time,
you will need to run the automatic or manual
searching of channels.
Press 1. h button to display the on-screen
menus.
Press 2. ï button until Install is highlighted.
Press 3. u button to select Install.
Press 4. ï button until Auto Program is
highlighted.
Press 5. u to start Auto Program.
Auto Program will start scanning for
channels automatically. When scanning
has completed, the progress bar display
will exit from the screen.
The first channel found will be displayed
on the screen.
Press 6. h or EXIT button to exit the
on-screen menus.
TIP:
To cancel or interrupt auto searching, press
the h or EXIT button. Only channels that
were found before interruption will be
stored.
Main
Language
T uner Mode
Install
Picture
Features
Sound
Auto Program
Manual
Name
Fav. Program
Install
Language
Manual
Name
Fav. Program
Press OK
to continue
T uner Mode
Auto Program
Auto Program
Channel
TV
14
471 MHz

10
Manual installation
Main
Language
T uner Mode
Install
Picture
Features
Sound
Auto Program
Manual
Name
Fav. Program
You can manually set the TV tuner and sys-
tem as well as fine tune the channels.
Changing the Tuner Mode
If you have problems using Auto Program
to search for channels, you can manually set
the tuner system.
Press 1. h button to display the on-screen
menus.
Press 2. ï button until Install is highlighted.
Press 3. u button to select Install.
Press 4. ï button until Tuner Mode is
highlighted.
Press 5. u button to select Tuner Mode.
Press 6. ï or Î button to select Auto,
Antenna or Cable.
Press 7. u button to select the option.
Press 8. h or EXIT button to exit the
on-screen menus.
Tuner Modes:
Automatic• : The TV will automatically
detect whether or not cable signal input
is present.
Antenna• : The TV will detect antenna
signals and will search for all antenna TV
channels available in your local area.
Cable• : The TV will detect cable signals
and will search for all cable TV channels
available in your local area.
Install
Cable
Auto
Manual
Name
Fav. Program
Auto Program
Antenna
Language
T uner Mode
11
Manual installation
Main
Language
T uner Mode
Install
Picture
Features
Sound
Auto Program
Manual
Name
Fav. Program
Install
System
Fine Tune
Language
T uner Mode
Name
Fav. Program
Auto Program
Manual
Manual
P A L-M
P A L-N
Fine Tune
Auto
NTSC
System
Changing the TV System
Press 1. h button to display the on-screen
menus.
Press 2. ï button until Install is highlighted.
Press 3. u button to select Install.
Press 4. ï button until Manual is
highlighted.
Press 5. u button to select Manual.
Press 6. u button to select System.
Press 7. ï or Î button to select Auto,
NTSC, PAL-M or PAL-N.
Press 8. u button to select the option.
Press 9. h or EXIT button to exit the
on-screen menus.
TV Systems:
Automatic• : The TV will automatically
detect the tuner system.
NTSC• : Used mainly in North America
and some South American countries.
PAL-M• : Used in Brazil.
PAL-N• : Used in Argentina, Uruguay and
Paraguay.
12
Manual installation
Main
Language
T uner Mode
Install
Picture
Features
Sound
Auto Program
Manual
Name
Fav. Program
Install
System
Fine Tune
Language
T uner Mode
Name
Fav. Program
Auto Program
Manual
Manual
System
10
-10
2
Fine Tune
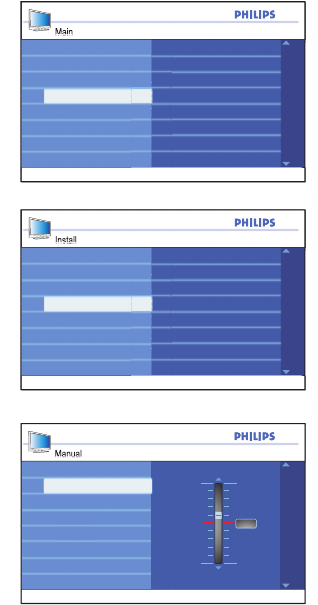
Fine Tuning your channels
You can fine tune the channels after you have
searched them automatically by using the
Fine Tune feature.
Switch to the channel number that you want
to fine tune.
Press 1. h button to display the on-screen
menus.
Press 2. ï button until Install is highlighted.
Press 3. u button to select Install.
Press 4. ï button until Manual is high-
lighted.
Press 5. u button to select Manual.
Press 6. ï button until Fine Tune is
highlighted.
Press 7. u button to select Fine Tune.
The Fine Tune level bar will be
displayed.
Press 8. ï or Î button to manually fine
tune the channel reception.
Press 9. h or EXIT button to exit the
on-screen menus.
13
Naming your channels
Main
Language
T uner Mode
Install
Picture
Features
Sound
Auto Program
Manual
Name
Fav. Program
Install
003
004
005
006
007
008
009
002
T uner Mode
Auto Program
Manual
Fav. Program
Language
Name
Install
003
004
005
006
007
008
009
Auto Store
Manual Store
Sort
Fav. Program
Language
002
Name
Install
003 N E W S
004 M O V I E
005 S P O R
006
007
008
009
T uner Mode
Auto Program
Manual
Fav. Program
Language
002 D O C U
Name
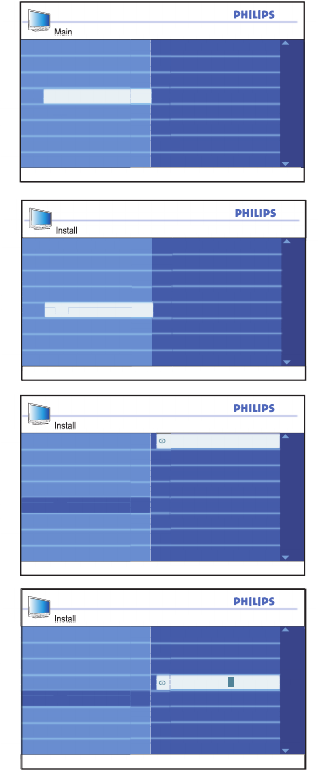
You can assign a short name for your
channels with the Name feature.
Press 1. h button to display the on-screen
menus.
Press 2. ï button until Install is highlighted.
Press 3. u button to select Install.
Press 4. ï button until Name is
highlighted.
Press 5. u button to select the first channel
number on the list.
Press 6. u button to start naming the
channel number.
Press 7. Æ button until a rectangular block
cursor appears next to the channel
number.
Press 8. ï or Î button to cycle through the
list (A-Z, 0-9) to select the characters or
numbers to use for the channel name.
Press 9. u button to move the cursor to
the second space and repeat step 7.
You can use up to a combination of 5
characters or numbers for naming your
channels.
Press 10. u button to store the name to the
channel.
The channel number and name will be
displayed on the top left of the screen.
Press 11. h or EXIT button to exit the
on-screen menus.
14
Storing your favorite channels
Main
Language
T uner Mode
Install
Picture
Features
Sound
Auto Program
Manual
Name
Fav. Program
Install
002
003
004
005
006
008
009
007
Language
T uner Mode
Auto Program
Manual
Name
Fav. Program
Install
002
003
004
005
006
008
009
007
Language
T uner Mode
Auto Program
Manual
Name
Fav. Program
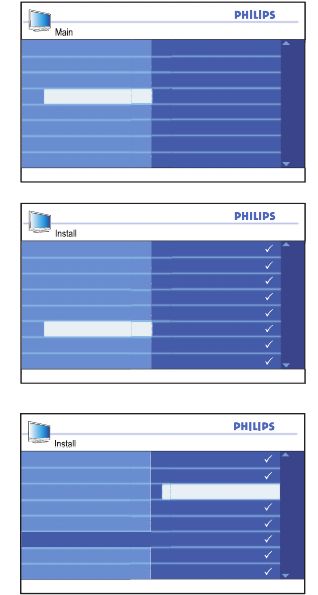
The Favorite Program feature lets you
store only the channels you want on your
favorite list which you can access using the
remote control channel buttons.
Press 1. h button to display the on-screen
menus.
Press 2. ï button until Install is highlighted.
Press 3. u button to select Install.
Press 4. ï button until Fav. Program is
highlighted.
The list of channel numbers are displayed
on the right panel.
All channel numbers will have a tick ()
beside them to indicate as favorite chan-
nel by default.
Press 5. u button to select the first channel
number on the list or ï button to move
down the list.
Press 6. u button to remove the tick
or add the tick to the corresponding
number.
Only channel numbers with the tick will
be added to your favorite list. When you
use the Channel + / - buttons, you will
only have your favorite channels.
Press 7. h or EXIT button to exit the
on-screen menus.
TIP:
To access channels not in the favorite list,
use the numeric (0-9) buttons.

15
Adjusting your picture settings
Main
Brightness
Color
Install
Picture
Features
Sound
Contrast
Sharpness
Color Temp
Contrast +
NR
Picture
Color Temp
Contrast +
Sharpness
Brightness
Contrast
Color
100
0
5 3
NR
Picture
Cool
Normal
Color Temp
Contrast +
Sharpness
Brightness
Contrast
Color
Warm
NR
Picture
Off
On
Color Temp
Contrast +
Sharpness
Brightness
Contrast
Color
NR
The Picture sub-menu features let you
adjust the various picture settings.
Press 1. h button to display the on-screen
menus.
Press 2. u button to select the Picture
sub-menu.
Press 3. ï or Î button to highlight the
sub-menu items.
Press 4. u button to select the Picture
sub-menu item.
Press 5. ï or Î button to adjust the set-
tings of the sub-menu items.
Press 6. u button to select the Picture
sub-menu item.
Press 7. ï or Î button to adjust the
settings of the sub-menu items.
Depending on which Picture item you
are adjusting, some items will have the
level indicator bar, some with discreet
settings such as Cool, Warm and
Normal, or On and Off.
Press 8. h or EXIT button to exit the
on-screen menus.
Picture settings:
Brightness• : Adjust how bright the
picture should be.
Color• : Adjust the intensity of the colors.
Contrast• : Adjust how light or dark the
tones should be.
Sharpness• : Adjust the detail level of the
picture.
Color Temp• : Set the color to Cool
(moreblue), Normal (balanced) or
Warm (more red).
Contrast +• : Enhances the contrast of
the picture.
NR• : Noise Reduction. Reduces picture
noise (random dots).
16
Adjusting your sound settings
Main
Equalizer
Balance
Install
Picture
Features
Sound
A V L
Incr. Surround
SAP
Forced Mono
Equalizer
120 HZ
200 HZ
500 HZ
3 KHZ
7500 HZ
12 KHZ
12
K
50
-50
0
1200 HZ
Sound
Off
On
SAP
Forced Mono
Incr. Surround
Equalizer
A V L
Balance
Sound
Mono
Spatial
SAP
Forced Mono
Incr. Surround
Equalizer
A V L
Balance
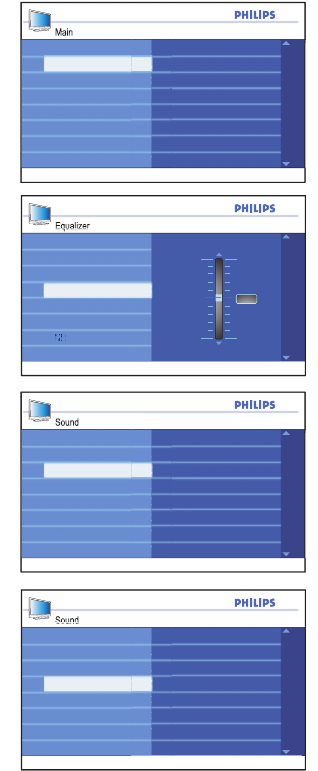
The Sound sub-menu features let you adjust
the various sound settings.
Press 1. h button to display the on-screen
menus.
Press 2. ï button to highlight the Sound
sub-menu.
Press 3. u button to select the Sound
sub-menu.
Press 4. ï or Î button to highlight the
sub-menu items.
Press 5. u button to select the Sound
sub-menu item.
Press 6. ï or Î button to adjust the set-
tings of the sub-menu items.
Depending on which Sound item you are
adjusting, some items will have the level
indicator bar, some with discreet settings
such as Mono, Spatial, or On and Off.
Press 7. h or EXIT button to exit the
on-screen menus.
Sound settings:
Equalizer• : Adjust each individual fre-
quency (tone).
Balance• : Adjust the left and right
speaker sound level.
AVL• (Automatic Volume Leveler):
Control the sudden sound level increase
when changing channels or during
advertisement slots
Incr. Surround• : Enhanced stereo effect.
Select Incredible Surround or Stereo
(when in stereo mode) or Mono or
Spatial (when in mono mode).
SAP• (Secondary Audio Programming):
Activate to allow alternative languages or
commentary.
NOTE:
Stereo and Incredible Surround modes
can only be selected when the TV broadcast
is in stereo. You can also press the f
button to toggle the sound modes.
• Forced Mono: Select Off to leave
broadcast signal as is. Or select On to
force the signal to mono.
17
Using the timer
Features
Sleep
Time
Closed Caption
Active Control
Timer
Parental Lock
Child Lock
Start Time
Stop Time
Channel
Activate
Display
Timer
Off
15
Channel
Activate
Stop Time
Start Time
Time
30
60
90
120
180
Display
45
Sleep
Main
Timer
Child Lock
Install
Picture
Features
Sound
Parental Lock
Active Control
Closed Caption
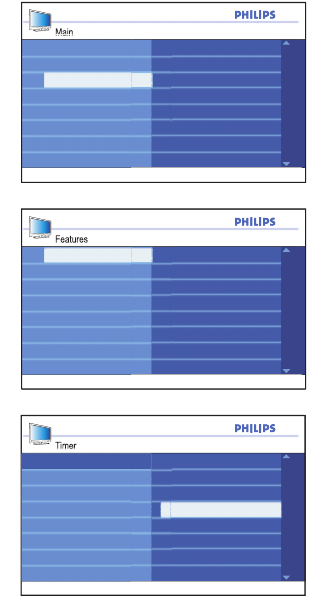
The Timer sub-menu features let you set the
time and program the TV set to switch on or
off automatically.
Setting the sleeptimer
Press 1. h button to display the on-screen
menus.
Press 2. ï button until Features is
highlighted.
Press 3. u button to select the Features.
Press 4. u button to select Timer.
Press 5. u button to select Sleep.
The right panel will display the sleep
timer settings: Off, 15, 30, 45, 60, 90, 120,
180 and 240 minutes.
Press 6. ï or Î button to select the
number of minutes remaining before the
TV set automatically switches to standby
mode.
Press 7. u button to confirm the setting.
Press 8. h or EXIT button to exit the
on-screen menus.
TIP:
You can check if the sleeptimer is enabled or
how much more time remaining by pressing
the STATUS button on the remote control.
The status will be displayed on the bottom
center of the screen.
To cancel sleeptimer, select Off in the Sleep
sub-menu.

18
Using the timer
Main
Timer
Child Lock
Install
Picture
Features
Sound
Parental Lock
Active Control
Closed Caption
Features
Sleep
Time
Closed Caption
Active Control
Timer
Parental Lock
Child Lock
Start Time
Stop Time
Channel
Activate
Display
Timer
Channel
Activate
Stop Time
Sleep
Start Time
Display
1 4 : 2 5
Time
Timer
Channel
Activate
Stop Time
Sleep
Off
Time
Start Time
Display
On
Setting the TV time
Follow steps 1 to 4 from the section on
Setting the sleeptimer to access the
Timer sub-menu.
Press 1. u button to select the Timer
sub-menu.
Press 2. ï button to highlight Time.
Press 3. u button to select the Time
sub-menu.
The entry fields --:-- will be displayed for
you to enter the time in HH:MM format.
Use the numeric buttons (0-9) to enter 4.
the time.
Example: 10:45
Press 5. h or EXIT button to exit the
on-screen menus.
Displaying the TV time
You can display the TV time (which you have
set up) by pressing the STATUS button or
display it at all times by turning on Display.
Follow steps 1 to 4 from the section on
Setting the sleeptimer to access the
Timer sub-menu.
Press 1. ï button to highlight the Display
sub-menu.
Press 2. u button to select Display.
Press 3. ï or Î button to highlight On.
Press 4. u button to select On.
Press 5. h or EXIT button to exit the
on-screen menus.

19
Using the timer
Timer
Channel
Activate
Stop Time
Sleep
Display
2 0 : 0 0
Time
Start Time
Timer
Channel
Activate
Sleep
Display
2 1 : 4 0
Time
Start Time
Stop Time
Timer
Activate
Sleep
Display
2
Time
Start Time
Stop Time
Channel
Features
Sleep
Time
Closed Caption
Active Control
Timer
Parental Lock
Child Lock
Start Time
Stop Time
Channel
Activate
Display
Setting the wake-up clock
You can use the Timer feature to program
the TV set to switch on and off at a specified
time and channel.
Follow steps 1 to 4 from the section on
Setting the sleeptimer to access the
Timer sub-menu.
Press 1. ï button to highlight Start Time
is highlighted.
Press 2. u button to select Start Time.
The entry fields --:-- will be displayed for
you to enter the time in HH:MM format.
Use the numeric buttons (0-9) to enter 3.
the time.
Example: 20:00
Press 4. h or EXIT button to exit the
on-screen menus.
Press 5. Í button to return to the Timer
sub-menu.
Press 6. ï button until Stop Time is
highlighted.
Press 7. u button to select Stop Time.
Use the numeric buttons (0-9) to enter 8.
the time.
Example: 21:40
Press 9. Í button to return to the Timer
sub-menu.
Press 10. ï button until Channel is
highlighted.
Press 11. h or EXIT button to exit the
on-screen menus.

20
Timer
Sleep
Daily
Display
Off
Time
Start Time
Stop Time
Channel
Activate
Once
Using the timer
Press 12. ï or Î button to select the
channel number to be activated at the
specified time.
Press 13. Í button to return to the Timer
sub-menu.
Press 14. ï button to highlight Activate.
Press 15. u button to select Activate.
Press 16. ï or Î button to select Off, Once
or Daily.
Press 17. u button to select the option.
Press 18. h or EXIT button to exit the
on-screen menus.
Press 19. . button on the remote control
to switch the TV to standby mode.
Activate settings:
Off• : To cancel wake-up clock.
Once• : To set wake-up clock to activate
once only.
Daily• : To set wake-up clock to activate
everyday at this time.
NOTE:
If the TV is still switched on after you have
set the wake-up clock, the channel will
switch to the specified number at Start
Time.
Once the TV has been switched off via the
POWER button of the TV controls, the
wake-up clock settings will be lost.
21
Child-locking the TV
Main
Timer
Child Lock
Install
Picture
Features
Sound
Parental Lock
Active Control
Closed Caption
Features
Timer Off
Parental Lock
Active Control
Closed Caption
Child Lock
On
Features
Timer Off
Parental Lock
Active Control
Closed Caption
Child Lock
On
If you need to prevent children from
accessing the TV without adult supervision,
you can use the Child Lock feature.
Enabling Child Lock
Press 1. h button to display the on-screen
menus.
Press 2. ï button until Features is
highlighted.
Press 3. u button to select Features.
Press 4. ï button until Child Lock is
highlighted.
Press 5. u button to select Child Lock.
Press 6. ï or Î button to highlight On.
Press 7. u button to enable Child Lock.
Switch off the TV or put it on standby 8.
mode.
NOTE:
Once Child Lock has been enabled, you will
not be able to access any TV channels with
the CHANNEL + / - buttons on the TV
panel or operate any of its buttons.
The TV will only display “Locked” on the
bottom center of the screen.
Keep the remote control away from children
to prevent them from using it to by-pass
Child Lock.
Disabling Child Lock
Repeat steps 1 to 5 from the sction on
Enabling Child Lock
Press 1. ï or Î button to highlight Off.
Press 2. u button to disable Child Lock.
22
Controlling access to TV channels
Main
Timer
Child Lock
Install
Picture
Features
Sound
Parental Lock
Active Control
Closed Caption
Features
Timer
Parental Lock
Active Control
Closed Caption
Child Lock
----
Access Code
Parental Lock
004
006
007
008
009
002
Clear All
Lock All
Movie Rating
TV Rating
Block Options
Change Code
003
005
Lock Channel
Features
Timer
Parental Lock
Active Control
Closed Caption
Child Lock
****
Correct
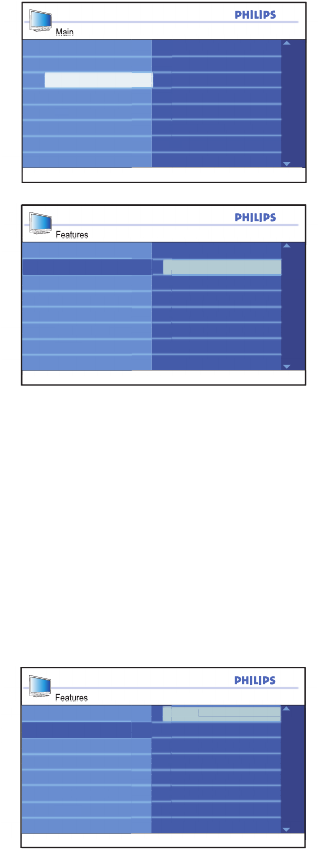
The Parental Lock feature lets you control
the type of TV programs that can be ac-
cessed with built-in program ratings based on
age and content.
Accessing Parental Lock
Before you can use the Parental Lock
features, you need to access it by entering
your Access Code.
Press 1. h button to display the on-screen
menus.
Press 2. ï button until Features is
highlighted.
Press 3. u button to select Features.
Press 4. ï button until Parental Lock is
highlighted.
Press 5. u button to select Parental
Lock.
If you are using Parental Lock for the first
time, you must enter the factory default
code 0711.
Enter 6. 0711 using the numeric (0-9) but-
tons.
The system will display Incorrect.
Enter 7. 0711 again.
You should see Correct displayed after
entering the code.
NOTE:
You may be prompted to change the access
code.
Otherwise, you can continue to access the
Parental Lock features.

23
Parental Lock
Clear All
Lock All
Movie Rating
TV Rating
Block Options
Change Code
Lock Channel
Controlling access to TV channels
Parental Lock
Lock Channel
Clear All
Lock All
Movie Rating
TV Rating
Block Options
New Code
Change Code
Parental Lock
Lock Channel
Clear All
Lock All
Movie Rating
TV Rating
Block Options
Confirm code
****
Change Code
Parental Lock
Lock Channel
Clear All
Lock All
Movie Rating
TV Rating
Display
Confirmed
****
Change Code
Changing Access Code
Use your current access code to gain entry
to the Parental Lock sub-menu.
Press 1. ï button highlight Change Code.
Press 2. u button to select Change Code.
You will be prompted to enter your new
access code.
Enter your new four-digit access code 3.
with the numeric (0-9) buttons.
You will be prompted to confirm the new
access code.
Re-enter your new access code. 4.
Once the system verifies your new code,
Confirmed will be displayed for a few
seconds.
Resetting the Access Code
If you have forgotten the access code that
you had set before, you can reset the code
back to the factory default access code.
Perform steps 1 to 7 from the section on
Accessing Parental Lock as if you were
accessing it for the first time.
Your access code will be reset to 0711.

24
Controlling access to TV channels
Parental Lock
004
006
007
008
009
002
Clear All
Lock All
Movie Rating
TV Rating
Block Options
Change Code
003
005
Lock Channel
Parental Lock
Clear All
Movie Rating
TV Rating
Block Options
Change Code
Locked
Lock Channel
Lock All
Y e s
Parental Lock
Clear All
Movie Rating
TV Rating
Block Options
Change Code
Cleared
Lock Channel
Lock All
Y e s
Channel 2
Blocked By
Channel Blocking
Access Code : ----
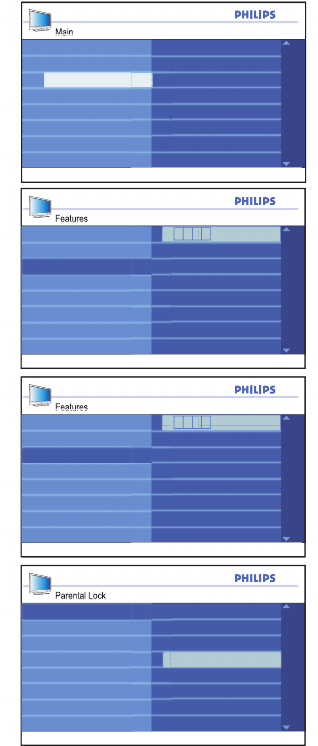
Locking channels
Use your current access code to gain entry
to the Parental Lock sub-menu.
Press 1. u button to select Lock
Channel.
The list of all the available channels will
be displayed on the right panel.
Press 2. ï button until Parental Lock is
highlighted.
Press 3. u button to select Parental
Lock.
If you are using Parental Lock for the first
time, you must enter the factory default
code 0711.

25
Controlling access to TV programs
Parental Lock
G
PG
TV Rating
Block Options
Lock All
Lock Channel
Clear All
Change Code
PG - 13
R
NC - 17
X
Blo
Movie Rating
Parental Lock
G
PG
TV Rating
Block Options
Lock All
Lock Channel
Clear All
Change Code
PG - 13
NC - 17
X
Blo
R
Movie Rating
Main
Timer
Child Lock
Install
Picture
Features
Sound
Parental Lock
Active Control
Closed Caption
Using the movie rating lock
(for certain regions only)
You can control access to movies based on
their content as defined by the Motion
Picture Association of America (MPAA).
Your TV is equipped with a computer chip
(V-chip) which can block program content
based on their rating.
All the settings apply to the AV inputs except
the HDMI inputs.
Repeat the steps from the section on
Accessing Parental Lock to get into
the Parental Lock sub-menu.
Press 1. ï button until Movie Rating is
highlighted.
Press 2. u button to select Movie Rating.
The list of movie rating labels will be
displayed on the right panel.
Press 3. ï or Î button to highlight your
choice of movie rating label.
Press 4. u button to enable the rating.
A tick () will appear beside the rating
label to indicate the rating lock has been
enabled.
The rating labels below the one you
select will also be enabled.
Press 5. Í button to return to the
Parental Lock sub-menu.
Movie Rating:
G: • Suitable for all ages.
PG• : Some material may not be suit-
able for children.
PG-13• : Some material may not be
suitable for children under 13 years
of age.
R• : Material not suitable for children
under 17 years of age. Requires pa-
rental guidance.
NC-17• : Not auitable for children
under 17 years of age. Has excessive
violence, sex or offensive language.
X• : Not suitable for children under 17
years of age. Content is pornographic.
26
Controlling access to TV programs
Block Options
Unrated
No Rating
Off
Blocking
On
Channel 2
Blocked By
PG - 13
Access Code : ----
Movie Rating
G
X
PG
PG - 13
R
TV Rating
TV - Y
TV - PG
TV - 14
TV - MA
Unrated
No Rating
TV - Y7
TV - G
NC - 17
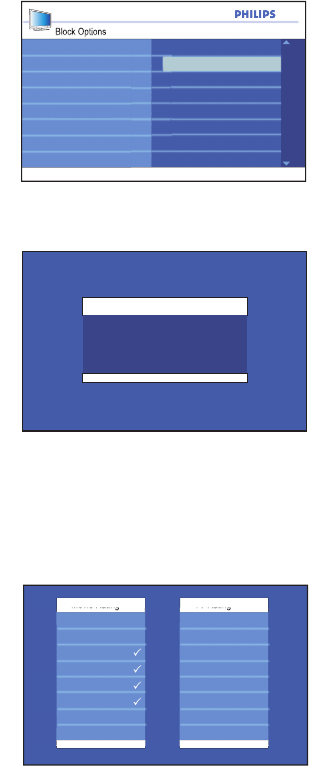
Press 6. ï button until Movie Rating is
highlighted.
Press 7. u button to select Block
Options.
Press 8. ï or Î button to highlight On.
Press 9. u button to enable Block
Options.
Press 10. h or EXIT button to exit the
on-screen menus.
NOTE:
Your movies will be blocked if they fall under
the movie rating category that you enabled.
The screen will display a message to inform
you the program has been blocked by the
movie rating.
Programs remain locked even after the TV
has been switched off.
You can choose to enter the Parental Lock
access code which will allow you to view the
program.
Subsequently, all other locked programs will
be viewable.
TIP:
You can check which movie or TV rating
you enabled while viewing your programs by
pressing the STATUS button twice on the
remote control.
27
Controlling access to TV programs
Main
Timer
Child Lock
Install
Picture
Features
Sound
Parental Lock
Active Control
Closed Caption
Parental Lock
TV-Y
TV-Y7
TV Rating
Block Options
Lock All
Lock Channel
Clear All
Change Code
TV-G
TV-14
TV-MA
Blo
TV-PG
Movie Rating
Using the TV Rating lock
(For certain regions only)
You can control access to TV programs
based on their content as defined by your
broadcaster or program provider. Your TV
is equipped with a computer chip (V-chip)
which can block program content based on
their rating.
The TV ratings are based on age with
content-based sub ratings so you can decide
which category and content to apply for the
rating lock.
Repeat the steps from the section on
Accessing Parental Lock to get into
the Parental Lock sub-menu.
Press 1. ï button until TV Rating is
highlighted.
Press 2. u button to select TV Rating.
The list of TV rating labels will be
displayed on the right panel. These ratings
are based on age groups.
Press 3. ï or Î button to highlight your
choice of TV rating label.
Some of the age-based ratings have con-
tent-based sub ratings. Refer to the table
listing the age and content-based ratings.
TV-Y: Suitable for all children. Programs
are not expected to frighten children.
TV-Y7: For children 7 years or olderwho
can tell make-believe from reality. Some
mild fantasy violence or comedic violence.
Programs may frighten younger children
under 7 years of age.
TV-Y7 FV: Fantasy violence more
intense or combative than those in TV-Y7
category.
TV-G: Suitable for all children but not
designed specifically for children.
TV-PG: Parental guidance needed. Some
violence, strong language, sexual
situations or suggestive dialog. Parents
should watch these programs with their
children.
TV-14: Not suitable for children under
14 years of age. Content has violence,
strong language, sexual situations or
suggestive dialog.
TV-MA: For adult viewing. Not suitable
for chiildren under 17 years of age.
Age-based rating Content-based rating
TV-Y• None
TV-Y7• FV (Fantasy violence)
TV-G• None
TV-PG• V (Violence)
S (Sex)
L (Strong Language)
D (Sexual dialog)
TV-14• V (Violence)
S (Sex)
L (Strong Language)
D (Sexual dialog)
TV-MA• V (Violence)
S (Sex)
L (Strong Language)

28
Controlling access to TV programs
TV Rating
Lock All
V
TV-MA
TV-Y
TV-G
TV-Y7
S
D
L
TV-14
TV-PG
TV Rating
Lock All
V
TV-MA
TV-Y
TV-G
TV-Y7
S
D
L
TV-14
TV-PG
Channel 5
Blocked By
TV - 14
Access Code : ----
Block Options
Unrated
No Rating
Off
Blocking
On
Press 4. u button to select to select the
age-based rating.
Press 5. ï or Î button to highlight Lock
All.
Press 6. u button to enable Lock All.
A tick () will appear beside the rating
label to indicate the rating lock has been
enabled.
If content-based rating labels are present,
they will also be enabled (with a tick
beside them).
To enable one or more ontent-based
ratings, highlight only those and press the
u button.
Press 7. Í button to return to the
Parental Lock sub-menu.
Press 8. ï button until Block Options is
highlighted.
Press 9. u button to select Block
Options.
Press 10. ï or Î button to highlight On.
Press 11. u button to enable Block
Options.
Press 12. h or EXIT button to exit the
on-screen menus.
NOTE:
Your programs will be blocked if they fall un-
der the TV rating category that you enabled.
The screen will display a message to inform
you that the program has been blocked by
the TV rating.
Programs remain locked even after the TV
has been switched off.
You can choose to enter the Parental Lock
access code which will allow you to view the
program.
Subsequently, all other locked programs will
be viewable.
29
Block Options
Unrated
No Rating
Off
Blocking
On
Controlling access to TV programs
Block Options
No Rating
Off
Blocking
On
Unrated
Block Options
Off
Blocking
On
Unrated
No Rating
Channel 5
Blocked By
No rating
Access Code : ----
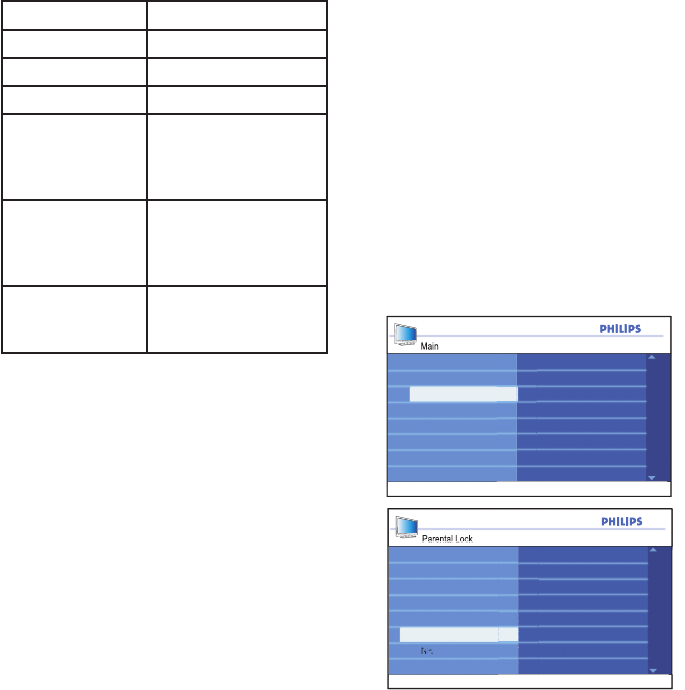
Turning off Blocking
You can temporarily disable Blocking even
after you have set the movie or TV rating
options. Select Off from the Block Options
sub-menu.
Press 1. u button to select to select Block
Options.
Press 2. ï or Î button to highlight Off.
Press 3. u button to enable Block
Options.
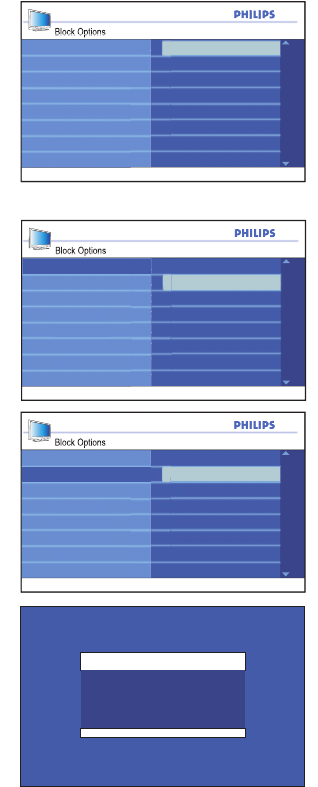
Blocking other programs
You can also block programs that are
unrated, such as documentaries, “director’s
cut” edition or programs that have no advi-
sory data (No Rating).
Repeat the steps from the section on
Accessing Parental Lock to get into
the Parental Lock sub-menu.
Press 1. ï button until Block Options is
highlighted.
Press 2. u button to select Block
Options.
Press 3. ï or Î button to highlight Un-
rated or No Rating.
Press 4. u button to select Unrated or
No Rating.
Press 5. u button to highlight On.
Press 6. u button to enable Unrated or
No Rating.
NOTE:
Programs with no rating or unrated will be
blocked and the screen will display a message
to inform youthe program has been blocked
by the TV rating.

30
Using Active Control
Main
Timer
Child Lock
Install
Picture
Features
Sound
Parental Lock
Active Control
Closed Caption
Features
OffTimer
Child Lock
Parental Lock
Closed Caption
On
Active Control
Features
Closed Caption
Timer
Parental Lock
Child Lock
Active Control
On
Off
Active Control will automatically adjust the
picture settings continuously to provide the
best picture quality under any signal
conditions.
Press 1. h button to display the on-screen
menus.
Press 2. ï button until Features is
highlighted.
Press 3. u button to select Features.
Press 4. ï button until Active Control is
highlighted.
Press 5. u button to select Active
Control.
Press 6. ï or Î button to highlight On.
Press 7. u button to enable Active
Control.
Press 8. h or EXIT button to exit the
on-screen menus.
Turning off Active Control
Repeat the steps 1 to 5 from the section
on Using Active Control.
Press 1. ï or Î button to highlight Off.
Press 2. u button to highlight Off.
Press 3. h or EXIT button to exit the
on-screen menus.
31
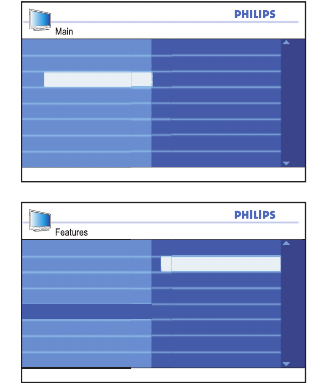
Using Ambilight (certain models only)
Main
Timer
Child Lock
Install
Picture
Features
Sound
Parental Lock
Active Control
Closed Caption
Ambilight
Features
Ambilight
Mode
Color
Balance
Timer
Child Lock
Parental Lock
Active Control
Closed Caption
Brightness
Ambilight
Ambilight
Off
Brightness
Mode
Color
Balance
Ambilight
On
Ambilight
Off
Brightness
Mode
Color
On
Balance
Ambilight
The Ambilight feature lets you watch your
programs in a unique ambience by produc-
ing a soft, light glow from the sides of the
TV. Ambient lighting from the TV provides a
more relaxed viewing experience. The
Ambilight colors changes automatically to
match the TV images.
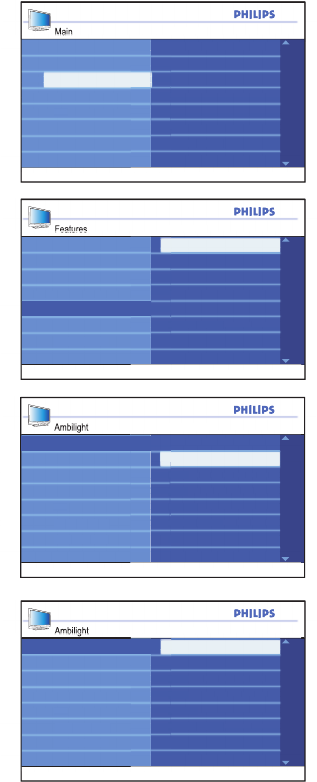
Turning on Ambilight
Press 1. h button to display the on-screen
menus.
Press 2. ï button until Features is
highlighted.
Press 3. u button to select the Features.
Press 4. ï button until Ambilight is
highlighted.
Press 5. u button to select Ambilight.
Press 6. ï or Î button to highlight On.
Press 7. u button to turn on Ambilight.
Press 8. h or EXIT button to exit the
on-screen menus.
Turning off Ambilight
Repeat the steps 1 to 5 from the section
on Turning on Ambilight.
Press 1. ï or Î button to highlight Off.
Press 2. u button to turn off Ambilight.
Press 3. h or EXIT button to exit the
on-screen menus.4.

32
Using Ambilight (certain models only)
Features
Ambilight
Mode
Color
Balance
Timer
Child Lock
Parental Lock
Active Control
Closed Caption
Brightness
Ambilight
Ambilight
Balance
Color
Ambilight
Mode
Brightness
100
0
5 0
Ambilight
Color
Moderate
Dynamic
Brightness
Color
Balance
Ambilight
Relaxed
Mode
Adjusting brightness
Repeat the steps 1 to 5 from the section
on Turning on Ambilight.
Press 1. ï button until Brightness is
highlighted.
Press 2. u button to select the Bright-
ness.
Press 3. ï or Î button to adjust the
ambient brightness level.
Press 4. h or EXIT button to exit the
on-screen menus.
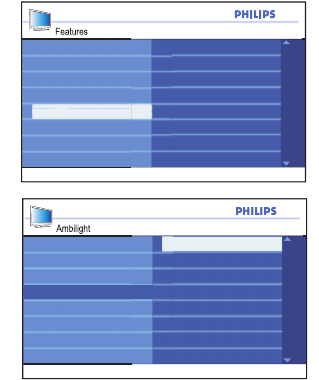
Selecting Ambilight modes
Repeat the steps 1 to 5 from the section
on Turning on Ambilight.
Press 1. ï button until Mode is highlighted.
Press 2. u button to select the Mode.
Press 3. ï or Î button to highlight the
different modes available.
Press 4. u button to select the mode.
Press 5. h or EXIT button to exit the
on-screen menus.
Ambilight modes:
Color• : Produces constant lighting ac-
cording to the settings in the Color
menu.
Relaxed• : Smoothens the rate of
brightness and color to give a more
relaxed viewing experience.
Moderate• : Uses the factory-defined
brightness and color settings.
Dynamic• : The rate of brightness and
color changes according to the picture
state.
33
Using Ambilight (certain models only)
Features
Ambilight
Mode
Color
Balance
Timer
Child Lock
Parental Lock
Active Control
Closed Caption
Brightness
Ambilight
Ambilight
Warm White
Blue
Red
Green
Y e llow
Brightness
Balance
Ambilight
Cool White
Mode
Color
Magenta
Custom
Selecting Ambilight color
Repeat the steps 1 to 5 from the section
on Turning on Ambilight.
Press 1. ï button until Color is highlighted.
Press 2. u button to select the Color.
Press 3. ï or Î button to highlight the
color choices available.
Press 4. u button to select your color
choice.
Press 5. h or EXIT button to exit the
on-screen menus.
Ambilight colors:
Warm white•
Cool white•
Blue•
Red•
Green•
Yellow•
Magenta•
Custom• : To enable the Custom Color
settings menu. (See topic on Using
Custom color).
34
Using Ambilight (certain models only)
Features
Ambilight
Mode
Color
Balance
Timer
Child Lock
Parental Lock
Active Control
Closed Caption
Brightness
Ambilight
Custom
Saturation
100
0
5 0
Palette
Custom
100
0
5 0
Palette
Saturation
Ambilight
Palette
Brightness
Balance
Custom Color
Ambilight
Saturation
Mode
Color
Ambilight
Warm White
Blue
Red
Green
Y e llow
Brightness
Balance
Custom Color
Ambilight
Cool White
Mode
Color
Magenta
Custom
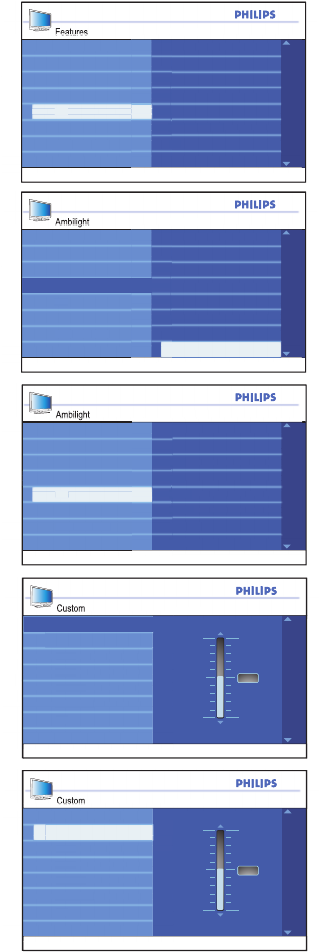
Using Custom color
Repeat the steps 1 to 5 from the section
on Turning on Ambilight.
Press 1. ï button until Color is highlighted.
Press 2. u button to select the Color.
Press 3. ï until Custom is highlighted.
Press 4. u button to select Custom.
This will enable the Custom Color
menu.
Press 5. Í button to highlight Color.
Press 6. ï button to highlight Custom
Color.
Press 7. ï or Î button to highlight Palette
or Saturation.
Press 8. u button to select Palette or
Saturation.
Press 9. ï or Î button to adjust the set-
tings.
Press 10. h or EXIT button to exit the
on-screen menus.
Ambilight Custom colors:
Palette: • Adjusts the general color of the
light output.
Saturation• : Adjusts the color intensity
of light output.
35
Using Ambilight (certain models only)
Features
Ambilight
Mode
Color
Balance
Timer
Child Lock
Parental Lock
Active Control
Closed Caption
Brightness
Ambilight
Ambilight
Color
Ambilight
Mode
Brightness
100
0
5 0
Balance
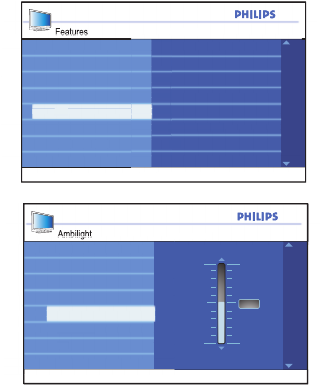
Setting Ambilight balance
The Balance menu lets you adjust the color
intensity of both sides fo the Ambilight light
sources.
Repeat the steps 1 to 5 from the section
on Turning on Ambilight.
Press 1. ï button until Balance is
highlighted.
Press 2. u button to select Balance.
Press 3. ï or Î button to adjust the
Balance levels.
Press 4. h or EXIT button to exit the
on-screen menus.
36
Turning on Closed Captions
Features
CC Off
CC2
CC Mute
Timer
Child Lock
Parental Lock
CC1
Active Control
Closed Caption
Main
Timer
Child Lock
Install
Picture
Features
Sound
Parental Lock
Active Control
Closed Caption
You can enable closed captions for your
programs if your broadcasting station pro-
vides caption service.
Closed captions (CC) are subtitles hidden
in the video signals which you can turn on
or off unlike the normal subtitles you see in
movies which cannot be turned off.
CC are subtitles for dialog and descriptions
(useful for the hearing-impaired).
Press 1. h button to display the on-screen
menus.
Press 2. ï button until Features is
highlighted.
Press 3. u button to select Features.
Press 4. ï button until Closed Caption is
highlighted.
Press 5. u button to select Closed
Caption.
Press 6. ï or Î button to highlight CC,
Off, CC1, CC2 or CC Mute.
Press 7. u button to select Closed
Caption option.
Press 8. h or EXIT button to exit the
on-screen menus.
Closed Caption choices:
CC Off• : Turn off Closed captioning.
CC1• : Most channels transmit closed
captions in CC1 mode. Closed captions
can be in Spanish, Portuguese or English.
CC2• : Broadcasters may transmit closed
captions in CC2 mode. CC2 is rarely
used.
CC Mute• : Closed captions in CC1
mode will be displayed only when the
sound is turned off via the Mute button.
37
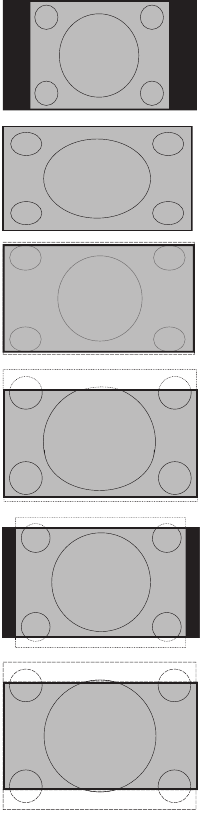
Changing your picture format
4 : 3
16 : 9
(Widescreen)
Superzoom
Subtitle
Zoom
Movie Expand
14 : 9
Movie Expand
16 : 9
The pictures you get on your TV may be
in the widescreen (16:9) or standard (4:3)
format depending on your broadcast stations.
You can select various screen formats to suit
the type of programs you watch.
Press the 1. ë button repeatedly to cycle
through the available picture formats.
Picture Formats:
4:3• : Entire picture is reproduced on the
screen with black bands on the left and
right of the screen.
16:9• : The picture is displayed in its
original proportions as transmitted.
Superzoom• : Removes black bands on
the sides of the screen of 4:3 format
programs with minimal distortion.
Subtitle Zoom• : The 4:3 format pro-
gram is displayed on the entire screen
leaving the subtitles area visible. Some of
the top of the picture is cropped off.
Movie Expand 14:9• : The picture is
enlarged to fit horizontally with black
bands visible at the sides of the screen.
Movie Expand 16:9• : The picture is
enlarged to fill up the screen and elimi-
nate the top and bottom black bands.
Some of the top and bottom of the
picture is cropped off.
38
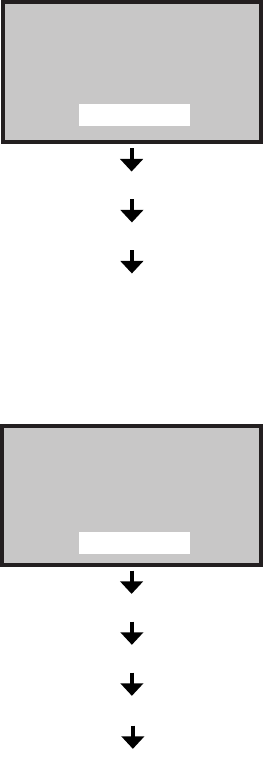
Using the Auto Sound and Auto Picture features
MOVIES
MUSIC
VOICE
PERSONAL
NATURAL
SOFT
MULTIMEDIA
RICH
PERSONAL
Your TV comes with pre-set Auto Sound
and Auto Picture settings to match
different listening environment.
Press the 1. Ú button repeatedly to cycle
through the available sound settings.
The sound setting type will be displayed
at the bottom center of the screen.
Auto Sound settings:
Movies• : Gives you the sensation of being
in the middle of the action.
Music• : Low tones to emphasize music.
Voice• : High tones to emphasize dialog.
Personal• : Your own sound settings can
be stored here. you can only change the
settings for Personal.
Press the 1. ≈ button repeatedly to cycle
through the available sound settings.
The picture setting type will be displayed
at the bottom center of the screen.
Auto Picture settings:
Rich• : Brilliant and sharp pictures for
bright environment.
Natural• : Suitable for living room
conditions.
Soft• : Suitable for poor signals and living
room conditions.
Multimedia• : Optimal settings for
graphical media.
Personal: • Your own picture settings can
be stored here. You can only change the
settings for Personal.
NOTE:
If you change any picture settings in the
Picture or Sound sub-menus, your pre-
vious Personal setting will be overwritten
with the current changes you made.
39
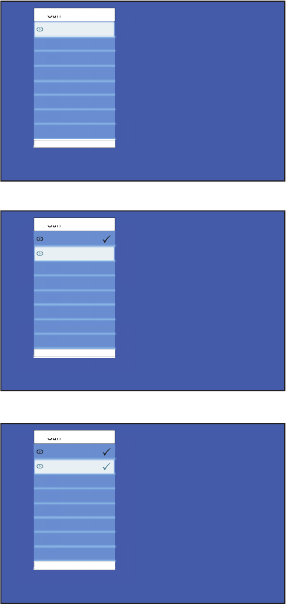
Using the Surf feature
Surf
002
Surf
002
003
Surf
002
003
You can store up to 8 of your favorite
channels in the Surf list.
You will be able to surf your channels by
displaying the Surf list at the press of a but-
ton and using the cursor button to scroll the
list of programs.
Adding channels to your Surf list
Press the numeric (0-9) buttons or 1.
Channel + / - buttons to switch to your
favorite channel.
Press the 2. SURF button to display the
Surf list.
You should only see one channel number
on the list. This is the same channel
number you are on.
Press 3. u button to select to add the
channel to the Surf list.
You should see a tick () beside the
channel number to indicate that it has
been stored in the Surf list.
Repeat steps 1 to 3 to add more channels
to the Surf list.
Removing channels from Surf list
Press the 1. SURF button to display the
Surf list.
Press 2. ï or Î button to highlight the
channel number you want to remove.
Press 3. u button to remove the channel
from the Surf list.
The channel number will be deleted from
the list.
Repeat steps 2 to 3 to remov more
channels while the Surf list is still dis-
played.
40
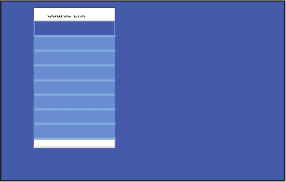
Using the Source List
Source List
HDMI 1
HDMI 2
A V
SIDE
CVI 2
CVI 1
VGA
TV
Your TV is equipped with several audio and
video connection jacks for you to connect to
devices such as DVD players and record-
ers, Home Theater systems, High-Definition
devices and many more.
The Source List lets you select the audio and
video source that your device is connected
to.
Press the 1. AV button to display the audio
and video source list.
Press 2. ï or Î button to highlight your AV
source.
Press 3. u button to select your AV
source.
You should see the channel correspond-
ing to the AV source where your device
is connected to.
Audio / Video sources:
TV• : Normal TV broadcast via the 75
ohm antenna connector.
AV• : Composite video and audio output.
SIDE• : Headphone jack, Composite video
and audio, and S-Video input.
CVI 1• : Component video (Y Pb Pr) with
Component audio input.
CVI 2• : Component video (Y Pb Pr) with
Component audio input.
VGA• : Video Graphics Array with audio
input.
HDMI 1• : High Definition Multimedia
Interface input.
HDMI 2• : High Definition Multimedia
Interface input.
Refer to Quick Start Guide for connection
instructions.

41
Using your TV as a computer monitor
Source List
TV
HDMI 1
HDMI 2
A V
SIDE
CVI 2
CVI 1
VGA
Main
Brightness
Color
Install
Picture
Features
Sound
Contrast
Sharpness
Horizontal
V e rtical
Color Temp
Contrast +
Main
Timer
Child Lock
Install
Picture
Features
Sound
Parental Lock
Closed Caption
Phase
Clock
Auto Adjust
Reset
Your TV is equipped with a VGA port for
you to use as a computer monitor.
NOTE:
Refer to the Quick Start Guide for connect-
ing the computer to your TV.
Connect your computer to the TV via the
VGA cable (not supplied).
Press the AV button to display the audio 1.
and video source list.
Press 2. ï or Î button until VGA is
highlighted.
Press 3. u button to select VGA.
You should see your computer display on
the TV screen.
Most of the Picture and Sound settings are
the same as those in the TV mode.
Picture settings (VGA mode)
Horizontal• : To adjust the picture to the
left or right.
Vertical• : To adjust the picture upwards
or downwards.
Feature settings (VGA mode)
Phase / Clock• : To fine tune so that your
TV and computer’s display settings match.
Auto Adjust• : To synchronize the TV
and computer’s Phase/Clock rate auto-
matically.
Reset• : To override with the factory
default settings.
42
Using your TV in High Definition (HD) mode
The High Definition (HD) mode lets you
enjoy clearer and sharper pictures if you are
using HD equipment that can produce high
definition video signals.
Connecting the HD equipment
Connect the HDMI or DVI output from 1.
your HD equipment to the HDMI 1 or
HDMI 2 socket of the TV.
Use a DVI-to-HDMI cable if DVI output is
connected.
Connect the audio cable to the 2. L / R
audio jacks (AV) of the TV if you are us-
ing DVI output from your HD equipment
to connect to the TV.
Press the 3. AV button to display the
Source List and the Î or ï button to
select HDMI 1 or HDMI 2.
Press the 4. u button to switch to the
selected source.
Controlling the TV settings in HD
mode
Press the 1. h button to display the on-
screen menus.
Press the 2. Î or ï button to select
Picture, Sound or Features and press
u to select the items in the sub-menu.
Press the 3. Î or ï button to highlight the
settings and the Í or Æ button to adjust
the settings.
Press the 4. Í button to return to the
previous menu.
Press 5. h or EXIT button to exit the
on-screen menus.
Source List
TV
HDMI 2
A V
SIDE
CVI 2
CVI 1
VGA
HDMI 1
Picture sub-menu
The • Picture sub-menu options are:
Brightness, Color, Contrast,
Sharpness, Color Temp., Contrast+,
Horizontal Shift and Vertical Shift.
All the options work the same way as the •
ones in the TV Picture sub-menu except
for Horizontal Shift and Vertical
Shift.
Horizontal Shift• option lets you adjust
the horizontal position of the image.
Vertical Shift• option lets you adjust the
vertical position of the image.
Sound sub-menu
The • Sound sub-menu options are
Equalizer, Balance, AVL and Incr.
Surround. All the options work the
same way as the ones in the TV Sound
sub-menu.
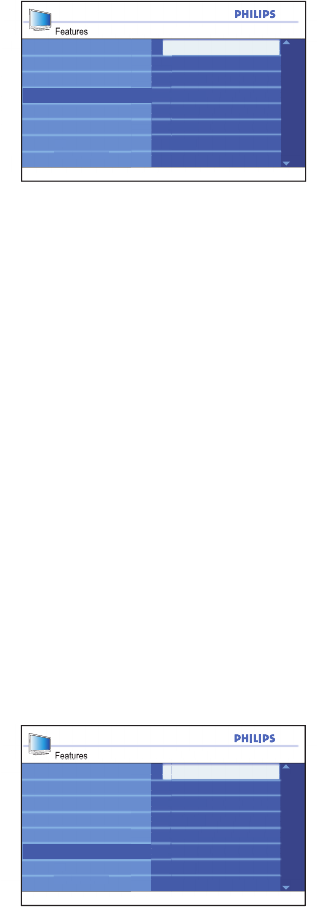
Features sub-menu
The • Features sub-menu options are
Timer, Child Lock, Parental Lock
and Active Control. All the options
work the same way as the ones in the TV
Features sub-menu except for Mode
Selection.
43
Using your TV in High Definition (HD) mode
Using Mode Selection
(
Applicable to 480p and 720p only)
When you connect HD equipment via HDMI
supporting resolutions of 480p or 720p, the
Mode Selection options will be available in
the Features sub-menu.
You can select PC or HD mode.
Press the 1. h button to display the on-
screen menus.
Press 2. ï button until Features is high-
lighted.
Press 3. u button to select Features.
Press 4. ï button until Mode Selection is
highlighted.
Press 5. u button to select Mode
Selection.
Press 6. ï or Î button to select PC or
HD modes.
Press 7. h or EXIT button to exit the
on-screen menus.
Using Native 1080 mode
(For 1080p TV models only)
When you connect HD equipment via HDMI
or Y Pb Pr supporting resolution of 1080p,
the Native 1080 option in the Display sub-
menu will be available.
You can watch the original HD format which
is the true resolution from the input signals.
Press the 1. h button to display the on-
screen menus.
Press 2. ï button until Features is high-
lighted.
Press 3. u button to select Features.
Press 4. ï button until Display is high-
lighted.
Features
HD
Closed Caption
Active Control
Timer
Parental Lock
Child Lock
PC
Mode Selection
Features
Closed Caption
Active Control
Timer
Parental Lock
Child Lock
native 1080
Display

44
Using your TV in High Definition (HD) mode
Press 5. u button to select Display.
Press 6. ï or Î button to select Off or On.
Select On to watch your programs in the
original HD format (1080p).
Press 7. h or EXIT button to exit the
on-screen menus.
Note:
Your Philips TV is HDMI compliant. If you do
not get a good picture, it is not a defect of
your TV set.
Please change the video format on your
device (DVD player, cable set top box, etc)
to a standard format.
For example, you should select 480p, 576p,
720p, 1080i or 1080p for DVD players.
Display
On
Off
native 1080
Non 1080p models
HD format 480p 576p 720p 1080i
SD format 480i 576i
1080p models
HD
format
480p 576p 720p 1080p 1080i
SD
format
480i 576i

45
Troubleshooting
NOTE:
Before calling Service, refer to the troubleshooting topic for a list of symptoms and solutions
which may address your problem.
Symptoms Possible solutions
No display on
screen
Check whether power cord is properly connected into the mains •
socket and to your TV. If there is still no power, disconnect plug and
wait for 60 seconds and re-insert plug. Switch on TV again.
Press the • . on the remote control.
Poor reception
(“snowy” picture)
Check antenna connection to the TV and to the wall antenna socket. •
Try manually adjusting your picture. •
Check that you have chosen the correct TV system. •
Press the • STATUS button to check the signal strength.
No picture Verify that the supplied cables are connected properly (Example: •
Aerial cable to TV, power cables to mains plug).
Verify that you have selected the correct AV source.•
Verify that Child Lock has been disabled.•
No sound on
certain channels
Check whether the correct TV system is selected.•
No sound Verify that the volume is not set at minimum. •
Check that the Mute is not enabled. •
Check the connections between the optional equipment and the TV •
are correctly connected.
Sound
interference
Try switching off any electrical appliances to prevent interference.•
Examples: hairdryer, vacuum cleaner
Picture
interference
Try switching off any electrical appliances to prevent interference.•
Move any operating electrical appliances such as haridryers, vacuum •
cleaner away from the TV set.
TV not respond-
ing to remote
control
Move closer to the receiver at the front of the TV. •
Check that batteries are correctly installed on the remote control.•
Replace batteries if necessary•
Tiny spots on the
screen that do
not change color
This symptom is not a problem. The liquid crystal panel is built with •
very high precision technology giving you the fine picture details.
Occasionally, a few non-active pixels may appear on the screen as a
fixed point of red, blue, green or black. Note : this does not affect
the performance of the set.

46
Troubleshooting
Symptoms Possible solutions
Intermittent
flickering when in
HD mode
Picture noise is noticeable if the connected digital equipment such •
as DVD player or Set-Top box fail. Check the user manual of the
digital equipment you are connecting.
Use a standard-compliant (high-quality) HDMI cable.•
No sound or
picture but front
panel red light
is lit
Press the • . on the remote control.
VGA mode does
not work
Check VGA cable is connected securely. Verify that the correct AV •
source is selected.
Press the button to display the source list and select the correct •
one.
Check whether you have configured the computer to a compatible •
display resolution.
Check the graphics card setting of the computer.•
In S-Video mode,
the colour be-
comes faint
Check whether S-Video cable is connected securely.•
Black bar on top
and bottom of
screen in VGA
mode
Change PC refresh rate to 60 Hz. •
47
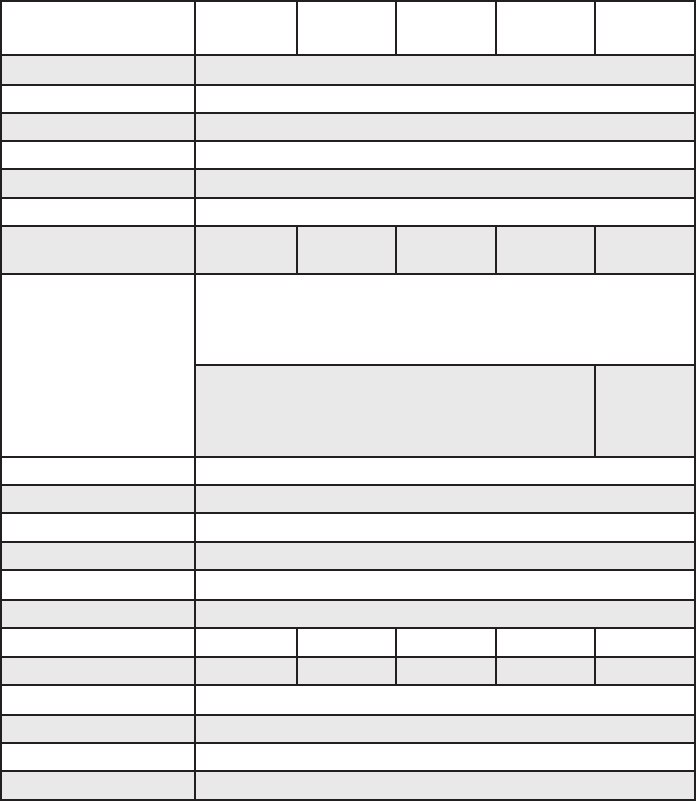
Specifications
26PFL5322 32PFL5332
32PFL7342
37PFL5332
37PFL7342
42PFL5332
42PFL7342
42PFL5432
52PFL5432
TV System Auto, PAL-M, PAL-N; NTSC / PAL (Playback)
Power
Mains 100-250 V, 50-60 Hz
Standby consumption < 1 W
Display
Type LCD WXGA Active matrix TFT
Screen size 26” (66 cm) 32” (80 cm) 37” (94 cm) 42” (107
cm)
37” (94 cm)
Resolution Computer formats: 640 x 480, 60, 67, 72, 75Hz, 800 x 600, 56, 60, 72,
75Hz, 1024 x 768, 60, 70, 75Hz, 1280 x 768, 60Hz
Video Formats: 640 x 480i, 640 x 480p, 720 x 576i, 720 x 576p, 1280 x
720p, 1920 x 1080i
Video
Formats:
1920 x
1080p
Sound
Output power 2 x 10 W
Connectivity
AV CVBS In, Audio L/R In, S-Video In
CVI 1 Y Pb Pr, Audio L/R In
CVI 2 Y Pb Pr, Audio L/R In
HDMI 1
HDMI 2
PC PC VGA In, PC Audio In
AV Out CVBS Out, Audio L/R Out
SIDE CVBS In, Audio L/R In, S-Video In, Headphone Out
Antenna 75 Ohm, F-type

48
Specifications
26PFL5322 32PFL5332
32PFL7342
37PFL5332
37PFL7342
42PFL5332
42PFL7342
42PFL5432
52PFL5432
Accessories Power cord, Quick Start Guide, User Manual, Table-top stand, Remote
control, AAA batteries x2
Dimensions
Set weight 11.2 kg 14.2 kg 23 kg 26.5 kg
Set weight with stand 14.4 kg 17 kg 30 kg 33.5 kg
Set dimensions
(W x H x D) mm
697.5 x
494.8 x
246.8
805 x 546.5
x 210
934 x 625.6
x 264.5
1046 x 686
x 264.5
934 x 625.6
x 264.5
Set dimensions with
stand (Wx H x D) mm
697.5 x 542
x 246.8
805 x 609 x
210
935 x 688.2
x 264.5
1048 x
748.6 x
264.6
935 x 688.2
x 264.5
Specifications subject to change without notice.


